-
Mitalee Parikh authoredMitalee Parikh authored

Final Project
####About vertical farming Vertical farming is the practice of food production that takes the form of vertically stacked layers and vertically inclined surfaces. The method is executed inside a controlled environment building, usually without soil or natural light.
Also known as indoor farming, vertical farming has in recent years gained recognition as a solid method of sustainability. The system was born out of the challenges affecting the 21st century, specifically issues like food shortage, resource depletion, and overpopulation. Controlled Environment Agriculture (CEA) is an advanced and intensive form of hydroponically-based agriculture where plants grow within a controlled environment to optimize horticultural practices.environmental conditions can be easily regulated to encourage the growth of plants
Benefits:
- grow more than one type of plant simultaneously without taking up much space
- 95% less water than conventional horizontal farming (ref: stat)
- More crops in the same times (when done at scale)
- controlled environment - not season dependant
- Reduced distance between food production and consumption
- Closer to self-sustainability if system done correctly
Cons:
- Energy consumption is high
- Specialised equipment
- Natural pollination not possible in a controlled environment
- Technology dependancy
While to make a viable business around vertical farming has many aspects like space optimisation, demand and supply rate, etc., in this project I want to concentrate on the technical aspects and make them modifiable when scaled to make a bigger farm. Decisions to make successful growing:
- Crop selection
- Lighting selection
- Data, sensors, control and software
- Substrate selection
- Spacing of crops
- Temperature and humidity
####PLAN:
- CAD - make 2D for cutting/production files & make a 3D model, animate and render
- Inputs - sensors to measure
- Output - LED
- CAM - lasercut parts, use vinyl cutter for
- 3D printing - joints, make casing
- Electronic design, production and embedded programming - To make the micro-contoller PCB
- Network and Communication - Add WiFi module to control it remotely?
- Interface and Application programming - To make a GUI (phone app?)

Process
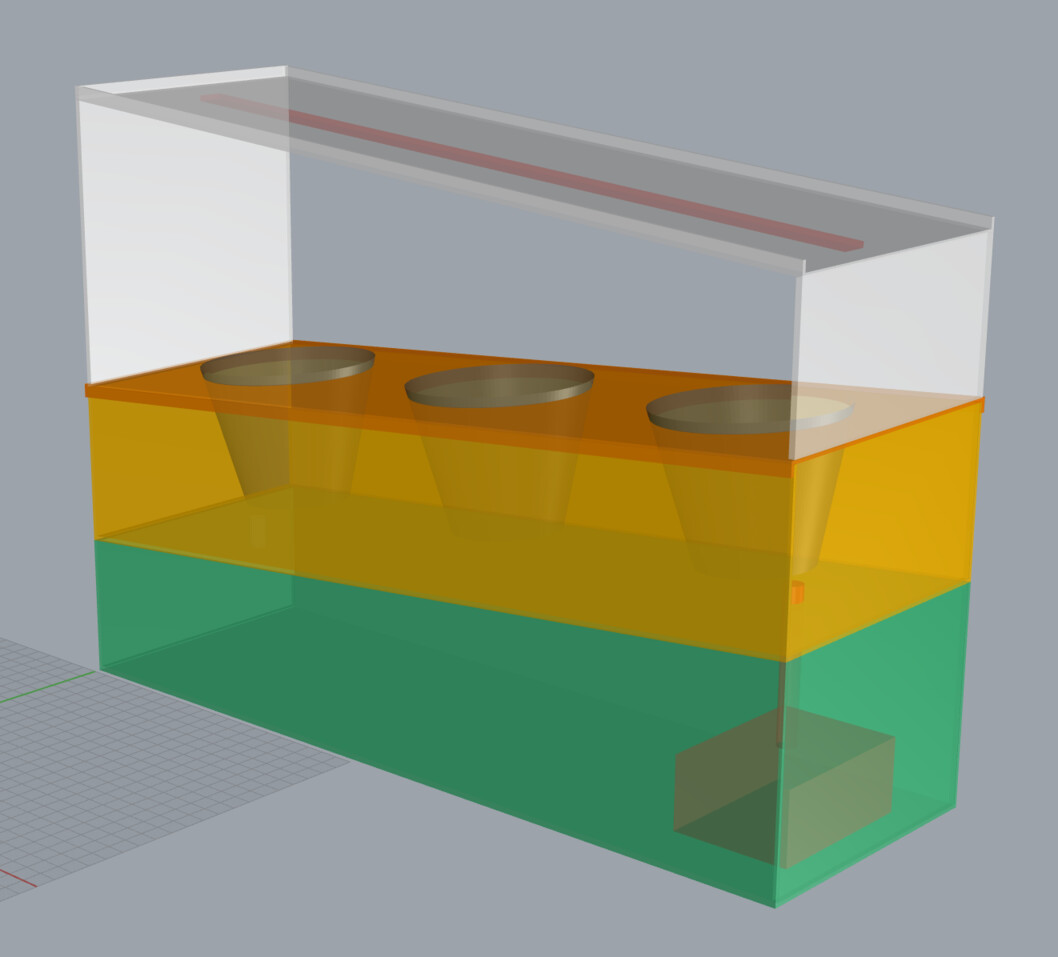
- First I started by making a CAD model in Rhino. I explored multiple forms.
 Since I need to make as many parts as possible in the lab instead of buying parts, I modify the design to make it simpler.

Designing the electronics:
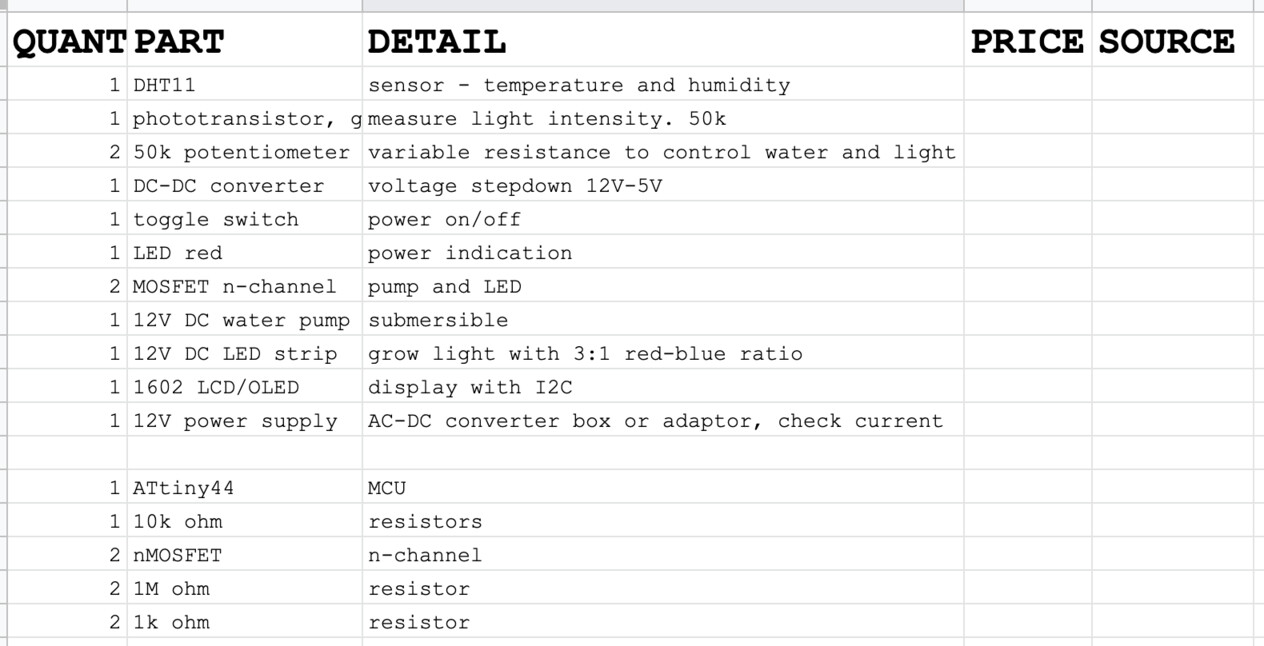
I listed out the inputs and outputs to include in the design after studying some similar projects like POWAR, Mixoponics, etc.
####Inputs to include:
- DHT11 - temperature and humidity sensor
- Phototransistor - to measure ambient light intensity
- Potentiometer / variable resistance - to control flow of water through pump
- Potentiometer / variable resistance - to control grow light intensity
####Outputs are:
- 12V DC pump to pump water through a sprinkler system
- 12V DC growth light strip with 3:1 RB 5050SMD LEDs
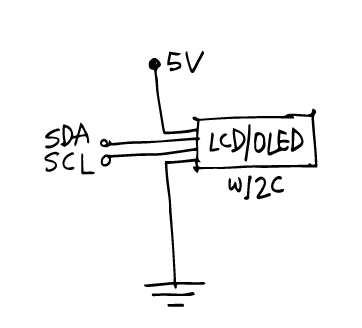
- SSD1306 OLED screen with I2C
With the help my instructor Steven, I developed a basic scheme for the electronics.
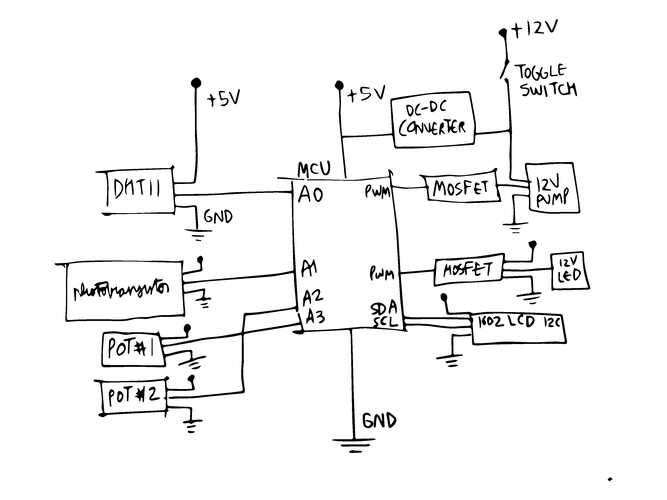
Also counting the pins required for each sensor and actuator:

Since I am not in the lab, I need to order some components myself. I start making a Bill of Materials for the project electronics:
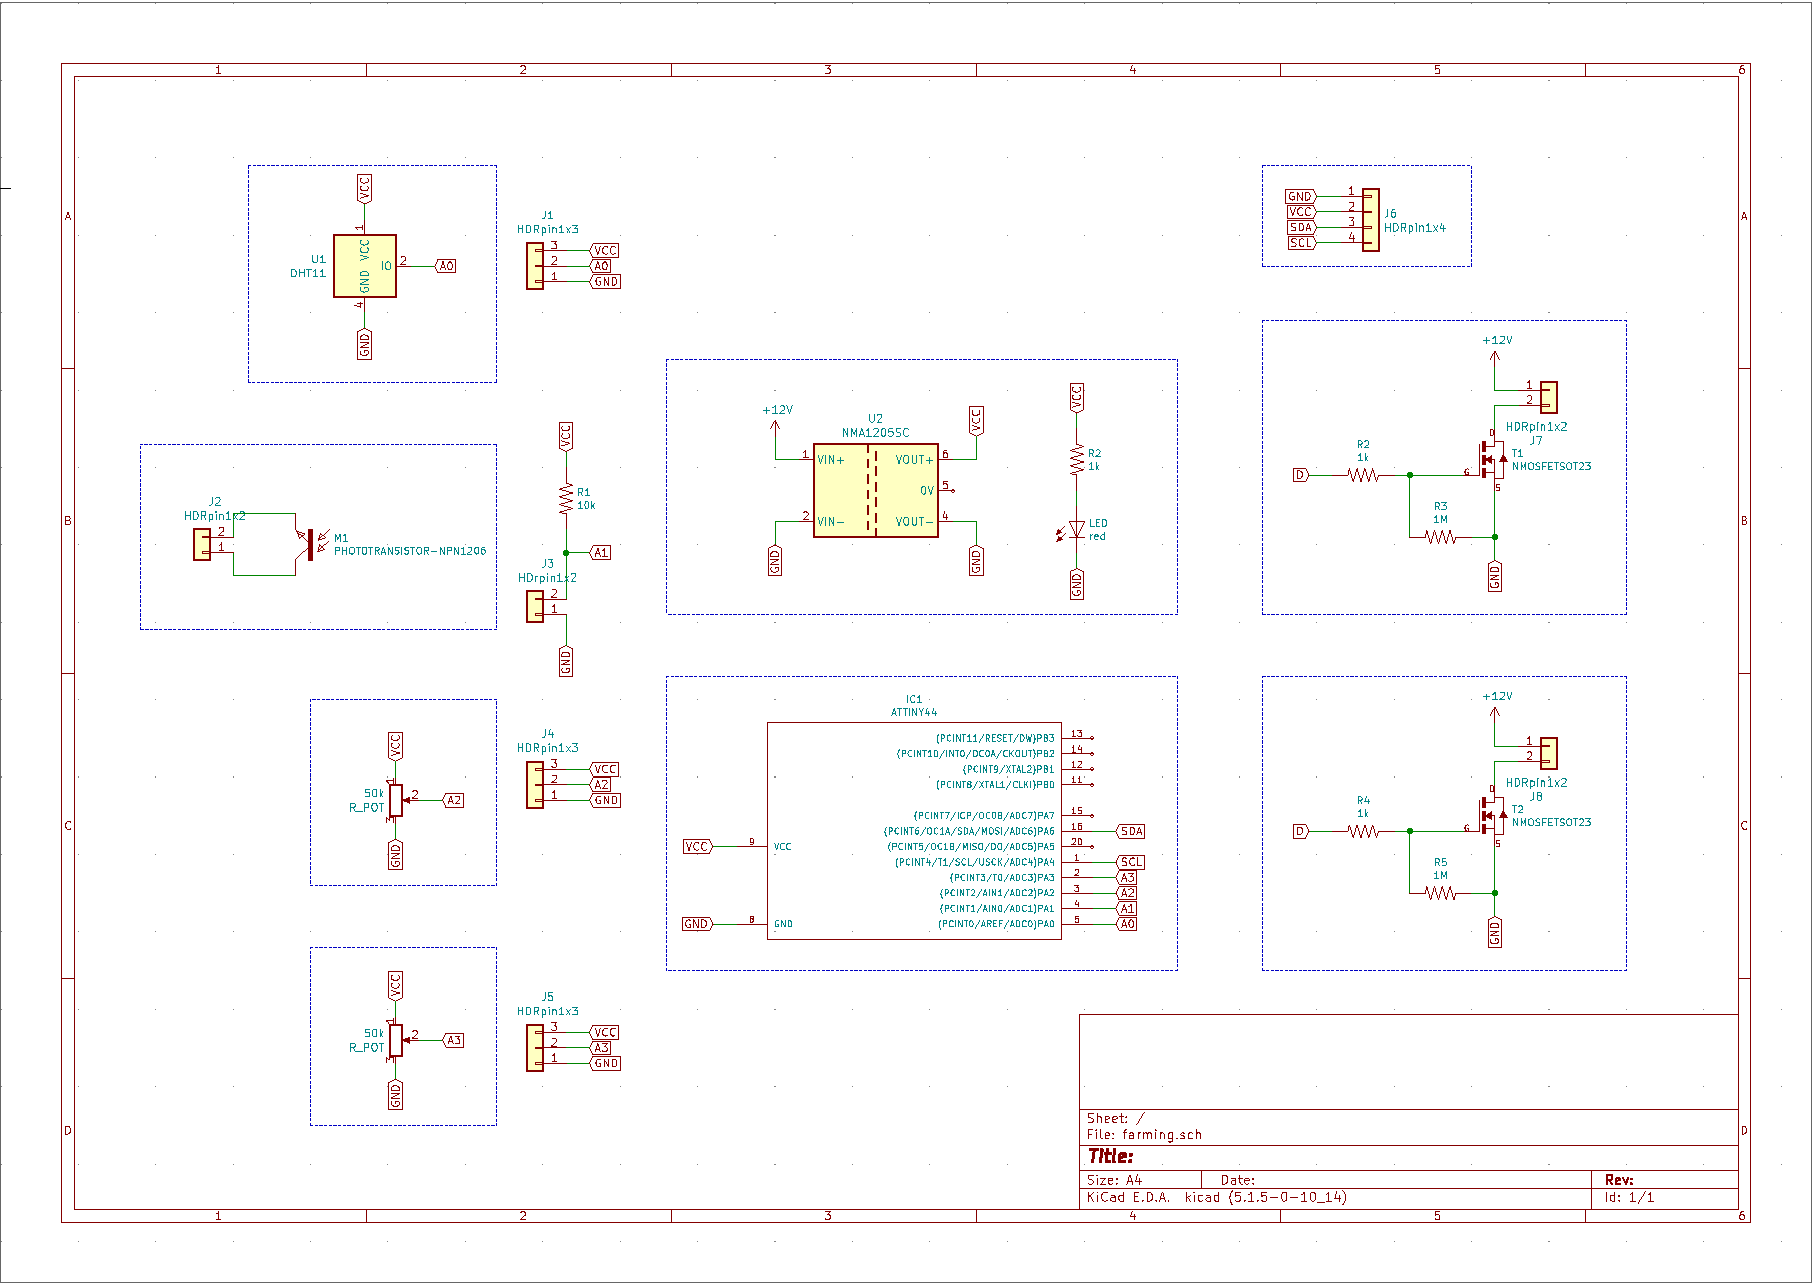
Next, I started making a schematic according to the sketch, connecting each component to V, GND and respective pins.
12V DC-DC converter to 5V
The DC-DC converter will have connections based on the datasheet...
I'm connecting a toggle switch to the converter, which will be the power on/off switch for the user
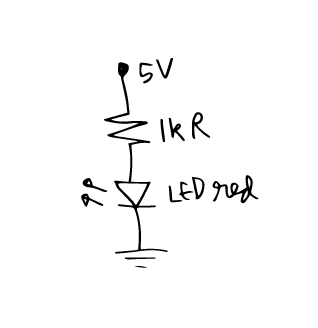
I'm also adding a red SMD LED as a power indicator.

Phototransistor has two options of circuits, according to this guide.

I use the Phototransistor in active mode - meaning the output of the transistor is proportional to the intensity of the light.
![]()
The potentiometers have 3 pins - one for power, one GND and third data that connects to the MCU.

The temperature and humidity sensor DHT11 has 3 pins - 5V power, GND and data which connects to a digital pin of the MCU.
Ref: Introduction to DHT11

I need to read more about which display to choose - for now I'm adding a 16x2 character LCD with I2C to make serial communication easier and use less pins on the MCU, only SDA and SCL.
A 12V DC water pump is connected to the MCU with a n-channel MOSFET so I can control the flow of water using Pulse Width Modulation.

A 12V DC LED growlight strip is connected to the MCU with a n-channel MOSFET so I can control the light intensity. These come in different ratios of red-blue lights. I use one with 3:1 meant for leafy plants.

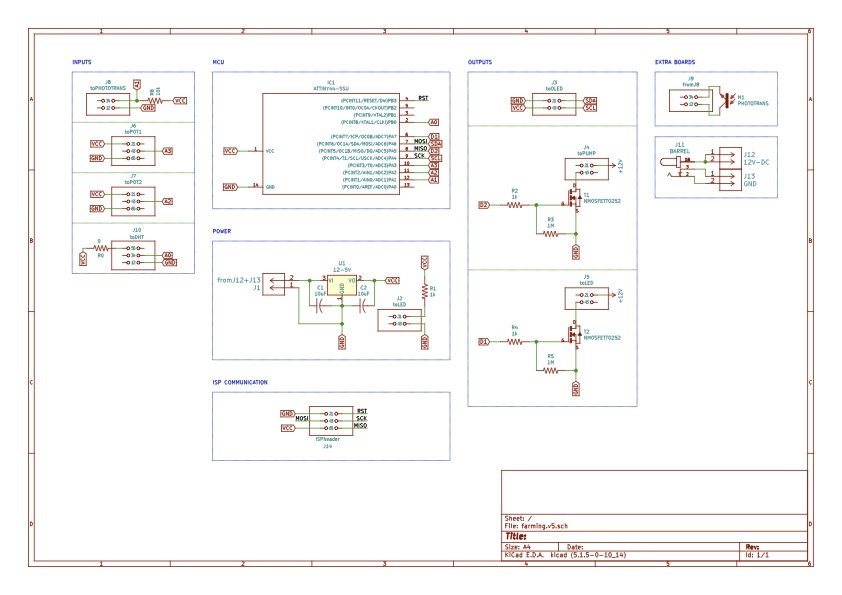
Next, I use KiCAD to put all the schematics together and begin to design my PCB.
While making the schematic I realise not all sensors and actuators need to be on the PCB itself, some like the pump and the led and the DHT11 need to be at a different physical location on the designed box, so I need to add header pins and connect them using wires later. To clarify this, I begin modifying my 3D CAD model on Rhino.
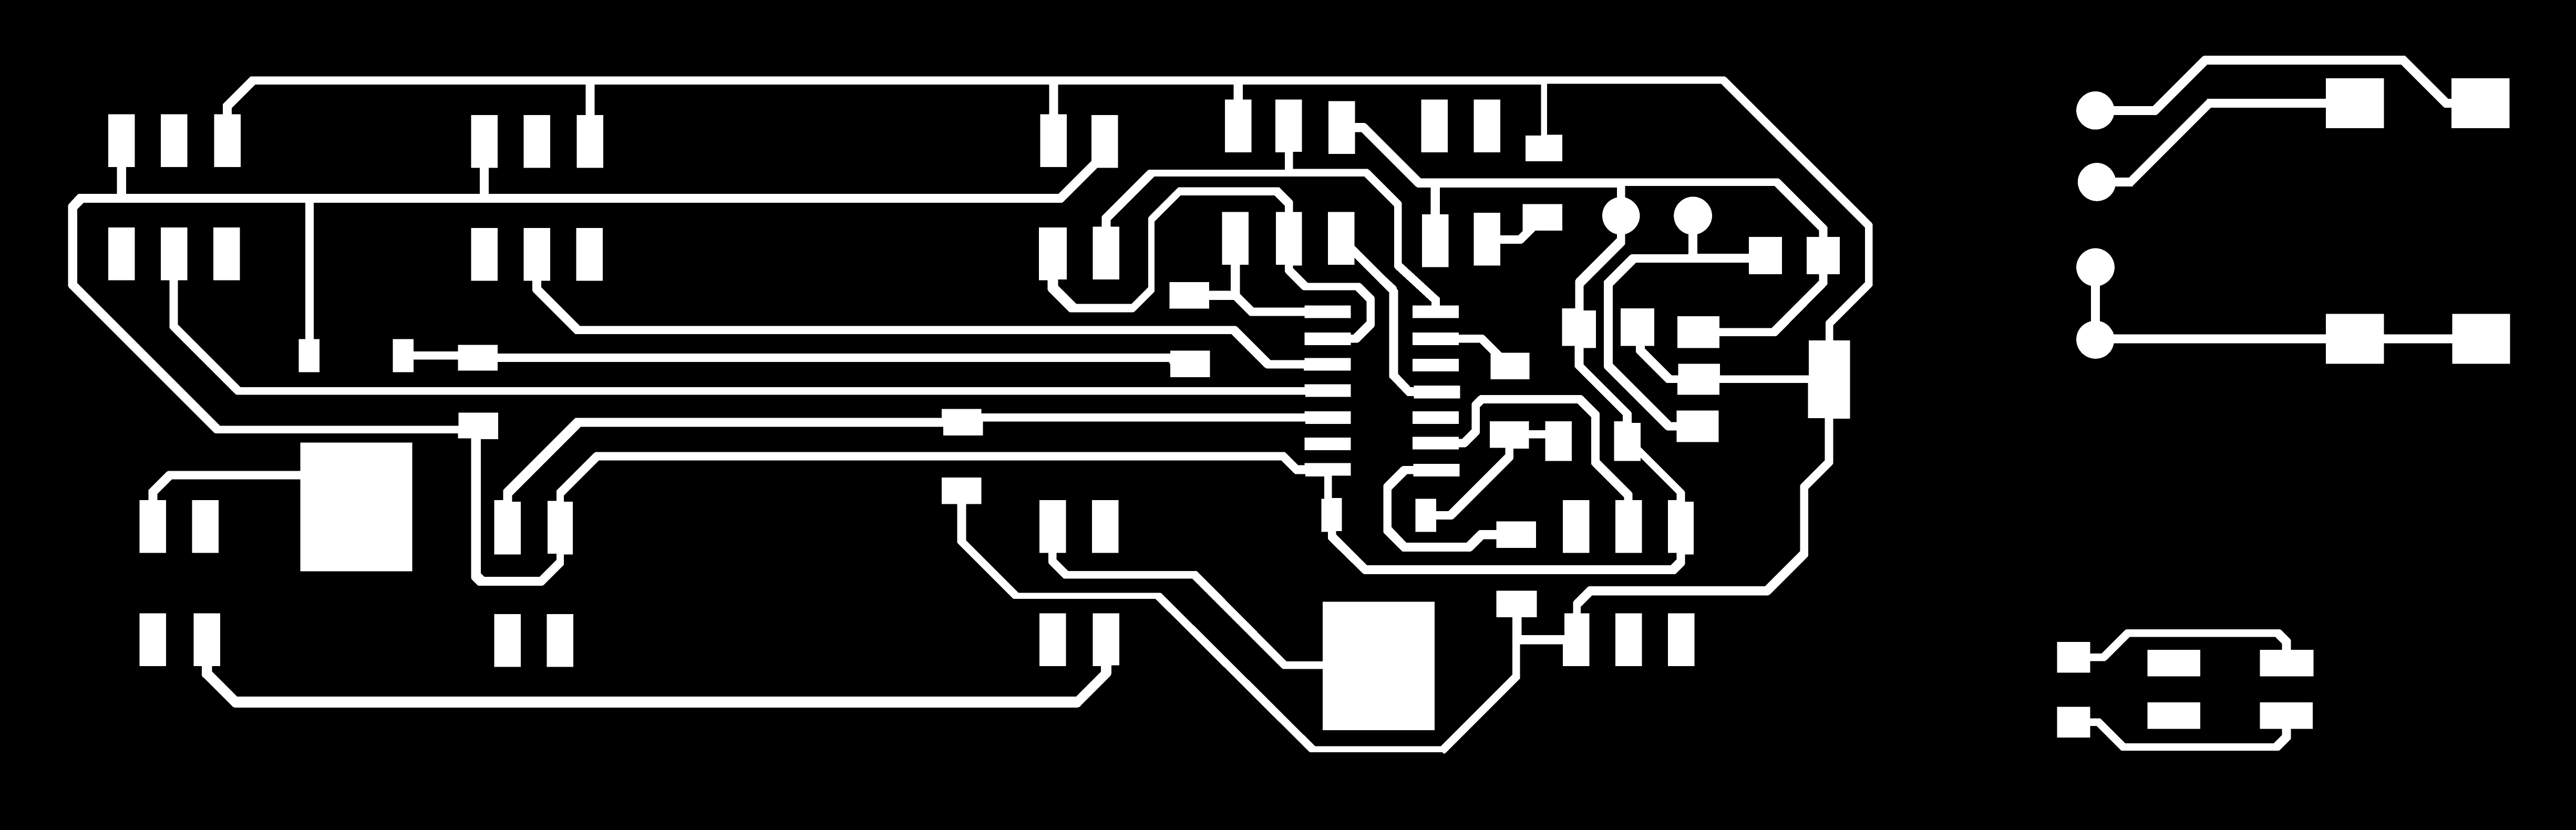
milling prcoess soldering Components Testing board Connecting all inputs and outputs
Programming: I will use the FabISP I made in Electronics Production week as a programmer to program my farming board with all the inputs and outputs.
AVRDUDE is a utility to download/upload/manipulate the ROM and EEPROM contents of AVR microcontrollers using the in-system programming technique (ISP).
- Connect the new board with a ribbon cable to the FabISP programmer through a compatible USB adaptor.
Check the orientation of the cables is on correct order. VCC of the FabISP matches the VCC of the target board(mine with ATtiny44) Check System Report > Hardware> USB, should detect the USBtinyISP. Next in a terminal window,
avrdude -c usbtiny -p t44It should show that the device is initialized and show a signature.
Next, I will start adding the i/o one by one starting with the OLED so I can use it as a display for troubleshooting along the way. Since I'm using a Attiny44 with 4k memory, I will use the minimal versions of OLED and DHT libraries to make enough space for the rest of the components.
- Install OLED library from https://github.com/datacute/Tiny4kOLED which is a Library for an ATTiny85 to use an SSD1306 powered, double buffered, 128x32 pixel OLED, over I2C.
Open Arduino IDE, in Tools > Board Manager, add the https://github.com/technoblogy/tiny-i2c in additional boards URLs.
Sketch > Include Library > Manage Librarries, select Tiny4kOLED and install.

3D printing
Knobs for potentiometers: [3D model]
Gcode file has these settings:
Wall Thickness speed Brim
Lasercutting
KICAD symbol and footprint guide: https://app.ultralibrarian.com/content/help/index.htm?converting-ultra-librarian-dow.htm
- What does it do?
- Who's done what beforehand?
- What did you design?
- What materials and components were used?
- Where did they come from?
- How much did they cost?
- What parts and systems were made?
- What processes were used?
- What questions were answered?
- What worked? What didn't?
- How was it evaluated?
- What are the implications?
####References
Controlled Environment Agriculture (CEA): https://cea.cals.cornell.edu/about-cea/
Basics of homegrown vertical farms:
https://www.diys.com/vertical-farming/
https://ecowarriorprincess.net/2017/11/a-beginners-guide-to-vertical-farming/
Aquapioneers: business integrating product and services for aquaponic farming http://aquapioneers.io/
Modular Vertical Farming projects:
https://hackaday.io/project/5084-modular-vertical-farming
https://moltkegarden.com/
Lighting:
https://www.lighting.philips.com/main/products/horticulture/hortiblog/vertical-farming/how-to-build-a-successful-vertical-farm
True garden:
https://truegarden.com/residential/
http://www.conceptualdevices.com/2015/03/farm-x-the-first-modular-vertical-farm-concept-unveiled-almost/
FARM-X. The First Modular Vertical Farm Concept (Almost) Unveiled :
https://create.arduino.cc/projecthub/dymonxd/diy-grow-led-light-designing-a-better-sun-1adec1

(via Skunkology.com).
Weather station : https://create.arduino.cc/projecthub/herolivechannel/weather-station-arduino-dht11-sensor-oled-display-2f8e50 DHT11 and OLED display
Prepare a summary slide and a one minute video showing its conception, construction, and operation Your project should incorporate 2D and 3D design, additive and subtractive fabrication processes, electronics design and production, embedded microcontroller interfacing and programming, system integration and packaging Where possible, you should make rather than buy the parts of your project Projects can be separate or joint, but need to show individual mastery of the skills, and be independently operable Present your final project, weekly and group assignments, and documentation