
6. Biofabricating
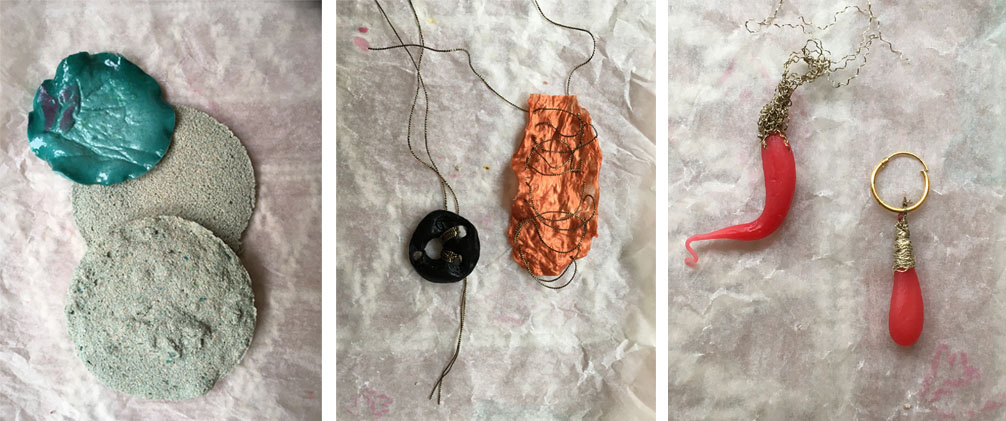 Some results of the week. Left: potluck foam with and without egg shell powder as filler, middle & left: piercing alginate plastics, Loes Bogers, 2019
*Warning: this is a long read. We did a crazy amount of techniques this week. Summing it up: "Eggs eggs eggs! All I want is eggs!" – Trixie Mattel & Ginger Minj)
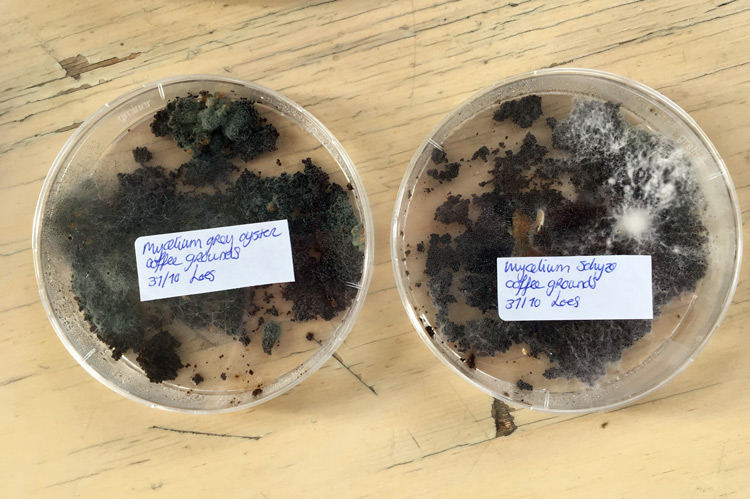 Attempt to grow mycelium on coffeeground: contaminated (left), and looking quite well (right), Loes Bogers, 2019
##Results and conclusions
This week, we cooked and cast gelatin-based bioresin, biofoil and biofoam, and agar-based biofoil, as well as gelatin/agar-based biofoil. Using a variation of color additives and fillers (rice starch, wheat starch, tapioca, ground egg shells)
We prepared alginate plastic that we cured with calcium chloride, and lastly we grew some mycelium that we hope to cure and dry into fake leather (not vegan though!).
My favourites? The egg shell/gelatin potluck foam, my alginate earring and button (and piercing and hand stitchingalginate in general). And the process! What a sensual week this was. I did not know what I wanted from these unfamiliar goos and mushes so felt a little lost, but eventually embraced and appreciated the fact I did not need to control the output for this week, just play, explore, and document findings.
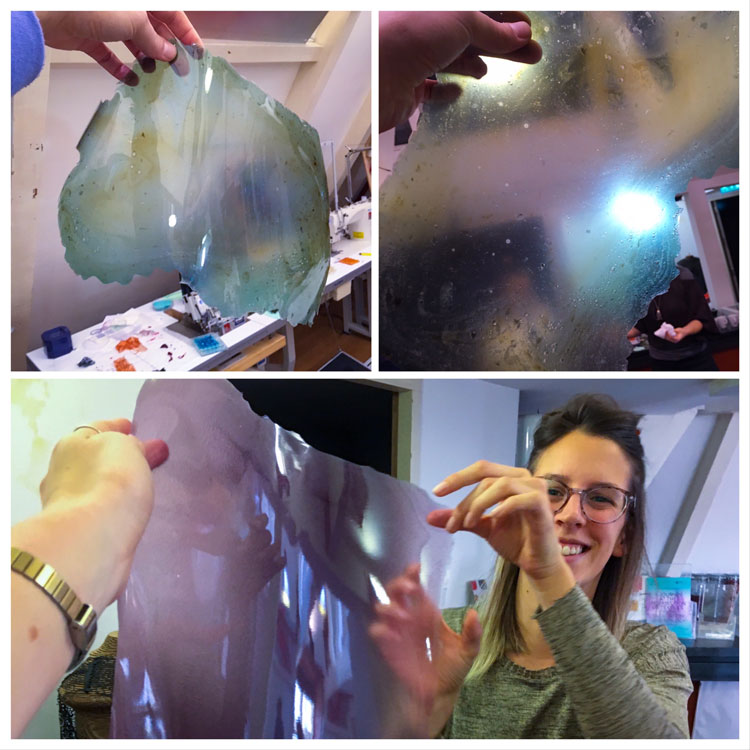 Some later results, the sheets I made with Bela and Bea, wowwwww.... Top and left: agar/gelatine foil with (cooked) tapioca, blue foodcoloring and blauwhout. Bottom: Agar and gelatine biofoil with foodcoloring. Loes Bogers, 2019
Conclusions and more questions/urges
- Making/growing materials is not like making instant soup. It takes a good amount of time and each period or gesture requires dedication, due consideration, and careful observation (I found out after the fact, unfortunately).
- Time is like a box of chocolates: you never know what you're going to get or: how my voluptuous, satisfying blobs turned into dry wrinkled raisins (with some exceptions!)
- Making materials is a very sensual and satisfying, yet stinky experience. And then everything starts to shrink.
- I am now known as the left-over queen
-
I couldn't cast a bioplastic sheet to save my life. Nope not true! I can and did cast some beautiful sheets with Bela and Bea! <3 - Making a bioplastic bottle appear out of an erlenmeyer bottle is a pretty good party trick
- Further research urges: practice casting larger sheets so I can give myself surfaces and options to further craft with. Larger egg shell foams (formulate a non-potluck recipe). Making some of materials conductive, then insulating the conductive materials with alginate plastic.
##Context and biomaterials basics
This paragraph is a mix of lecture notes from the lecture by Cecilia Raspanti, slides and info here and my own reflections.
The Plastic Issue
How long does your product need to function? Let the material follow function. A throw-away cup does not need to live longer than 45 minutes, why is it made of a material that takes forever to break down?
"Plastic is a substance the earth cannot digest." The 8 issues with plastics:
- It never goes away
- Its breakdown pollutes ground water
- Threatens wildlife
- Poisons our food chains
- Affects human health
- Attracts other pollutants
- Piles up in the environment
- Costs billions to abate
Source: www.plasticpollutioncoalition.org
So what we need are good alternatives. What I notice this week is that it's not easy to make or grow a material that lets itself be controlled easily. You can kind of see how plastic got very popular, you can quite literally bend it to your will, so when working with a design or engineering mindset, this is a pretty docile material. There's real urgency to developing techniques that allow us to use bio-based materials for a range of applications that also have aesthetic value. It seems like it's also still pretty experimental and/or relatively unknown amongst designers and industrial engineers. On the other hand, we can also learn to love the resistance of the materials we are trying to lead. Some will follow, others won't but this can have a beauty of its own we might start to be able to recognize (again). And maybe that will even make us realize how precious plastic really is.
First things first though, some definitions:
- Bio-based materials: They are made of organic or inorganic materials. Are they biological? Then they are bio-based.
- Bio-degradable materials: Can they be broken down by microbes under specific conditions that we - humans - create?
- Bio-compostable materials: Can they be composted within 180 days?
There are different ways of categorizing: by what they imitate (leather, plastics etc), or by how they are made. You can also categorize them under RAW ingredients and MADE materials.
Not new media, people
ALL of these are heritage techniques, they were used long before we started making plastics (polymers). Credit always, and be specific about your modifications and local specifity of the conditions under which you are cooking the materials, or specificity of your local ingredients. Room temperature in Amsterdam and New Delhi are not the same. Also tap water may or not have a neutral PH value, can be alkaline, which can breakdown some materials but not others.
#backtoschool: What is plastic?
Basis is of plastic is always a polymer with then added:
- plasticizer (for flexibility)
- filler (to avoid shrinkage)
- stiffener (e.g. fibers to structure and reinforce)
- expanding agent (to create foams)
- color/pigment (to modify color)
Processes that can be used in combo with plastic
It's versatile.
- Machine it and assemble it
- Glue by polimerisation
- Stitch together later
- Casting or machining
- Manual or machine cutting
- Milling, drilling, turning
- Heat shaping
- Impressing 3D patterns
- Casting, mould casting
- Profiles tubes, rods
- Digital extrusion
- 3D mould
Basics for bio-based & bio-degradable materials
We want stuff that is bio-based AND bio-degradable but ideally also bio-compostable (within 180 days).
Gelatine, agar, alginate, casein, cellulose, chitine or starch based plastics are a good start. These are the polymer replacements. Each have their own properties that can often be seen as both pros and cons.Also look for alternatives to modify the properties of the bioplastic, such as:
- Glycerine = plasticizer
- Egg shells, chalk = avoid shrinkage
- Fibers and natural debris = stiffeners
- Green soaps = expander (foaming)
- Natural dyes & pigments (like we did in biochrome week!)
And let's not forget these basics:
- Some nice people to play and share recipes, pots and mixtures with!
- A nice space that can get messy, with a lot of space for drying;
- Patience and time.
 The bare necessities and/or totally joyful luxury, Loes Bogers, 2019
Documenting
- Tools
- Ingredients
- Procedure
- Properties
The recipes are taken from Cecilia's lecture slides (see link above) that also mention the tools needed. I only copied the ingredients list and mentioned additives, the rest can be found in reference slides.
##Gelatine Plastics
The gelatine plastics will shrink a bit. More water means more shrinking. Additives might help. Gelatine bio foil and bio resin are strong but sensitive to heat. Gelatine silicon is super stretchy and totally compostable.
###Transparent/opaque bioresin and biosilicon: using cabbage as colorant
Basic bioresin Recipe:
- 48g gelatin powder
- 8g glycerine
- 240 ml water
Mix all ingredients at 60 degrees until smooth, then boil at 100 degrees for 5-10 mins, until it's like a syrup. This will make it harder but more brittle.
Basic biosilicone Recipe
- 48g gelatin powder
- 24g glycerine
- 240 ml water
Bring water to the boil. Add glycerine while stirring slowly, add gelatine. Gently mix, to avoid bubbles. Simmer for 15-20 mins at max 86 degrees (our stoves tend to be lower than the display suggests, so go a bit higher or use a thermometer). Let it thicken into syrup-like consistency.
Additives:
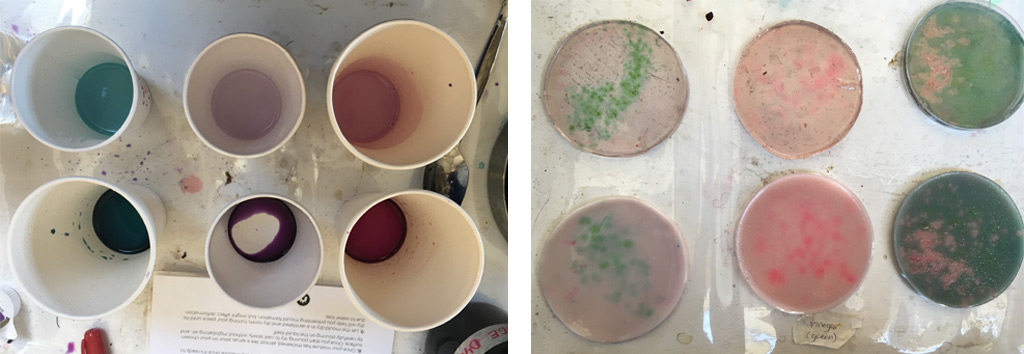
- Natural abbage ink (ethanol-based, neutral, modified with vinegar and modified with soda), and played with additional PH modifiers citric acid powder and soda ash that I sprinkled on top.
- Coffee cream to make mixture opaque.
I made 6 separate mixing bowls. I added coffee cream (a teaspoon) half the bowls to make them opaque, the rest would stay transparent, then I added the purple, pink and turqoise colorant. The blue/green one is the bioresin.
 The young ones in all their 2 mins old plump and juicy well-defined beauty. Image on the right (left to right): neutral cabbage ink, acidic cabbage ink, alkaline cabbage ink, Loes Bogers, 2019
Casting and releasing I cast both recipes into the lids of petri dishes and dried them while turning every now and then.
I released them from the mold when they cured a little bit. The acidic pink one was a lot harder to release, it remained snotty and wet, especially where I'd sprinkled the citric acid, it tore a little.
I kept a few pressed under a petri dish with weight on it to try keep them flat. These kept their form quite well, but some were a bit hard to release. The PH modifier gave interesting results and pretty much kept working as long as the plastic was still wet. The soda had more effects than the citric acid though, the pink faded very quickly.
Shrinkage and deformation
Biosilicone: it took quite some days to dry, and probably took even longer because I kept them pressed underneath some heavy books, probably the water couldn't evaporate so well. Apparently this is also how they tend to get moldy. These casts shrank about 25% without deforming much, compared to the foam and alginate experiments. They stayed relatively flat. I thought they'd cured enough after 3 days, but the baking paper I kept the samples between after the first days (when I pressed them under books) left an imprint, probably better to press between entirely smooth surfaces.
Bioresin: also took a long time to dry and was still going after 5 days. At this point it was already a bit firmer and had slightly more tendency to curl up. These shrank about 20% up to now (so less than the silicone).
The transparent bioresin mix worked quite beautifully for me. I let it settle a while to thicken before I casted it onto ridged silicon and textured surfaces that left a beautiful imprint also after shrinking. It turned very rigid and strong. The textures play very nicely with the light. Could it be flat one day?