
10. E-Textiles and Wearables II
Assignment
- Make a swatch with an input and output controlled with an Attiny
- Make two swatches with actuators, controlled with either Arduino or Attiny
- Figure out the Soft Serial communication to read an anolog sensor with an FTDI cable.
##Soft Speakers
Variables
- Coil tightness: The tighter the coil, the louder. (It will be since it will have a stronger magnetic field.)
- Material: You can hear noise because the sound waves vibrate off the material. How stiff or thick the material is effects the loudness.
- Magnet size The larger the magnet, the louder the volume. You can combine many small magnets or just get a big one BUT be careful - neodymium magnets are very strong.
- Magnet placement The volume will be louder the closer the magnet is to the center of the coil.
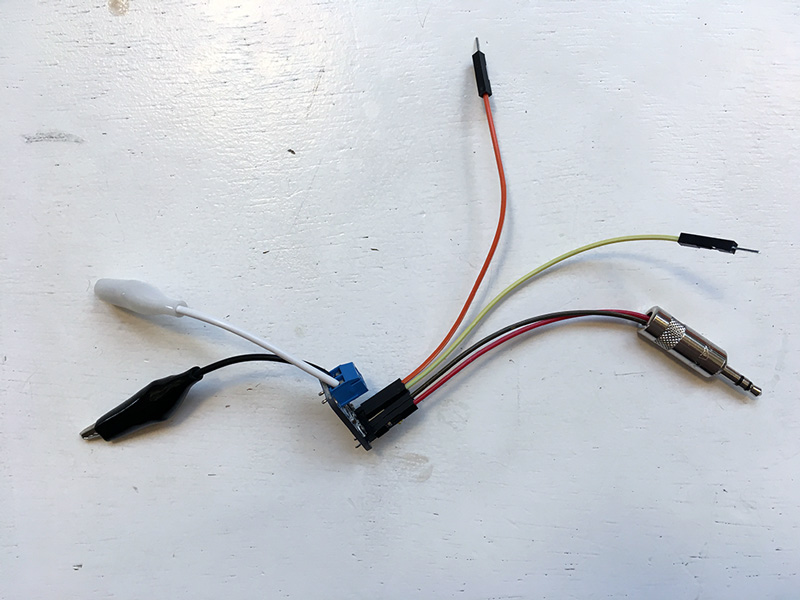
Making a jack connector and soldering the amp board
See tutorial Liza mentioned. Added some shrink tube. I soldered the amp board together and turned the volume knob on the board up to max with a tiny screwdriver. The board used is an Adafruit Mono 2.5W Class D audio amplifier and Liza describes how to make this jack connector here.
 Jack plug soldered to a Mono Amp, Loes Bogers, 2019
Designing & Fabricating coils
Needlepointing (Liza's instructions)
Draw a coil on your fabric or paper. It can be any shape you like. Thread your needle with one strand of conductive thread. You can run wax over the end to get it through the hole. Tie a knot 5-6 inches from the end. Come up through the center of the piece of fabric. Stitch around the coil, making sure the conductive thread lines do not touch each other. Make sure the extra 5-6 inches of thread does not get sewn into the coil! We need to keep them separate.
Lasercutting and heat'n bond
- Rhino: Spiral
- Illustrator: offset, add extra lines.
I designed lines of the spiral to be 3mm thick so I could still handle them. Too thin would be crazy. Then I tried to figure out how to work with conductive textile (I missed the first e-textiles week). This tutorial and Bela and Bea's documentation helped a lot!
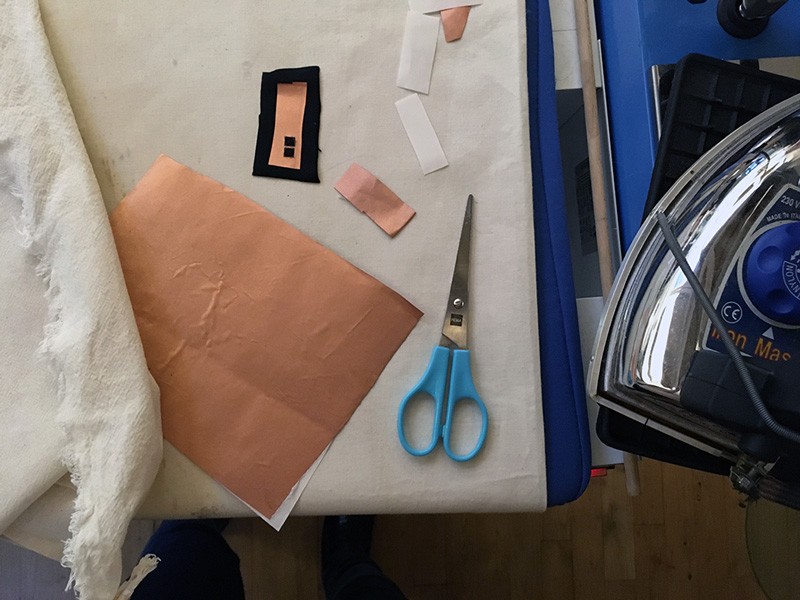 Preparing the conductive textile by ironing on heat 'n bond, Loes Bogers, 2019
Iron heat 'n bond to the conductive fabric before laser cutting (I put a little piece of cotton canvas over it to prevent the plastic melting to the iron. I kept the backing paper during the lasercutting. Cut with laser cutter at Speed 100/Power 20. I had to tape it down a few times to keep it from burning. Carefully ironed the coil to the textile, added a soldering braid from the back by making a little cut in the center so I could connect to both sides.
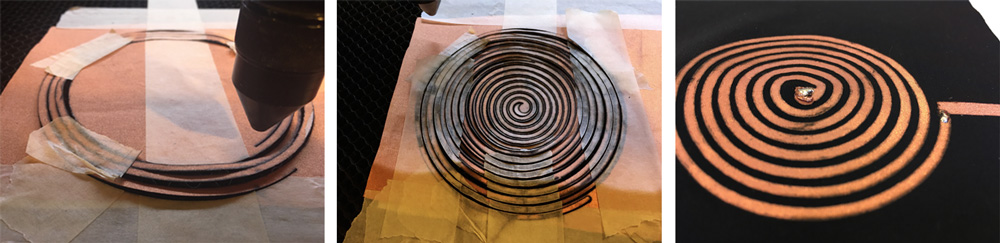 Trying to prevent the coil from going everywhere, Loes Bogers, 2019
Cut off a few windings because I couldn't get them on neatly. So it's a relatively small and weak coil. But it works! You have to get close but you can clearly hear the music with a stack of 5-10 magnets.
Lasercutting and needlepointing
I cut the same spiral shape but without the offset. Instead I just cut the line with a dotted pattern that I can follow with a conductive thread. This coil has a lot more windings so I'm pretty hopeful about these.
Troubleshooting the coil
The speaker made a very low sound, which is to be expected, since it has only 7 windings on the coil and I could only make them so tight. Making the coil trace thinner of leaving less offset would have made it impossible to transfer onto textile without shorting the traces somewhere.
What I did do was turn the volume on the mono amp all the way up. Added a few more magnets that I put below the coil instead of on top, giving the membrane (textile) a little more space to vibrate). I also used the multimeter to check the resistance in the coil. I couldn't get a stable reading easily so checked the two connections in my coil: one in the center where i connect a desoldering braid via the back, and one at the edge of the coil on the outside to make the other connection with a crocodile clip. I forgot to design it like that so just ironed on an extra piece, but the connection was less strong.
I soldered these connections to ensure a good flow of the current. Below a video of the technique. I heat the lycra a little by holding the iron just above the fabric, and then for a split second I touch the solder and conductive fabric, enough to flow. Super quick though or the lycra burns.
I checked again with the multimeter, now I could get a stable reading of 17.7 ohm across. Which I will use for the Thermochromic circuit in which this coil will feature as a heating pad. I embroidered the number on for reference.
I had to solder all the coils because threads broke etcetera etcetera. Lots of soldering-on-textiles practice involved this week.
 Four coils this week: clockwise from top left: laser cut conductive textile on lycra (17.7 ohm, 8 windings), conductive thread on cotton canvas (16.6 ohm, 19 windings, conductive thread on fake leather (17.2 ohm, 19 windings), crocheted copper wire laced with wool (5.5 ohm), Loes Bogers, 2019
Testing the different coils-as-speaker
- The hand-threaded black cotton canvas coil swatch - winner of the week! Nice audible sound even when your ear is not on the pad
- The hand-threaded red fake leather coil swatch - also pretty good!
- The lasercut lycra coil - very low sound but audible with a cup or by getting very close
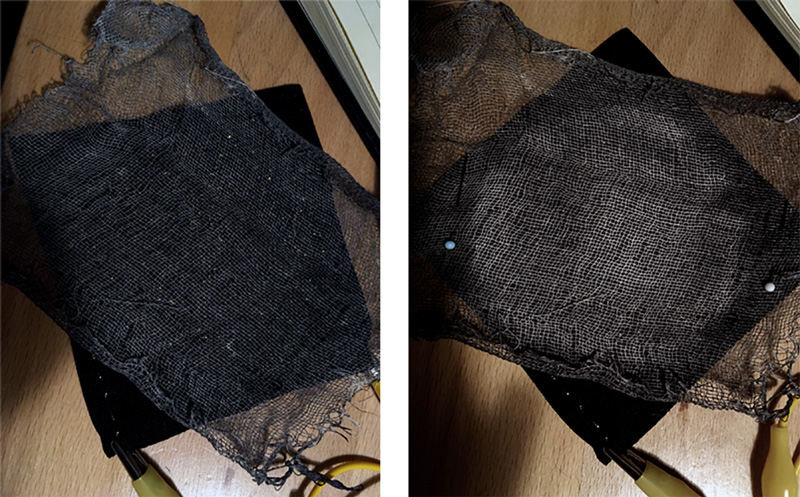
- The crochet copper wire - it basically has not membrane to help make the air particles move! So I tried a weaving technique to integrate a bit of wool to help the coil move air and make audible sounds. I broke a lead in the process, will fix later.
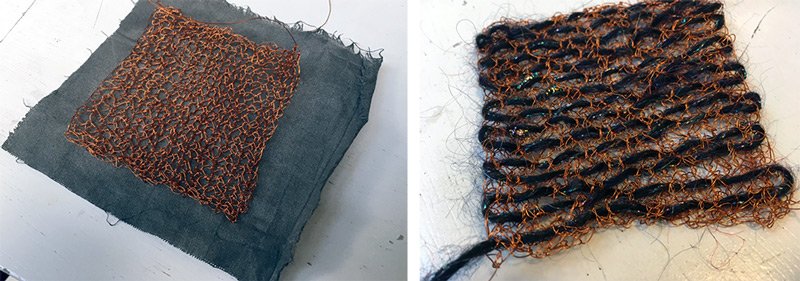 The crochet copper wire coil/heating pad (left), with added wool yarn to act as membrane (right), Loes Bogers, 2019
Controlling a soft speaker with an ATtiny85
The code I wrote for the headpad controlled by Attiny (see below) works unchanged for the speaker as well. The mono-jack connector is connected to a device playing music, and only when pin 3 writes HIGH, the amp gets 5V and the speaker will work.
const int buttonPin = 2;     // the number of the pushbutton pin
const int ledPin =  0;      // the number of the LED pin
const int speakerPin = 3;    // pin 3 connected to 5V of mono amp

int buttonState = 0;         // variable for reading the pushbutton status

void setup() {
  pinMode(ledPin, OUTPUT);
  pinMode(buttonPin, INPUT);
  pinMode(speakerPin, OUTPUT);

}

void loop() {
  buttonState = digitalRead(buttonPin);

  if (buttonState == HIGH) {
    digitalWrite(ledPin, HIGH);
    digitalWrite(speakerPin, HIGH);

  } else {
    digitalWrite(ledPin, LOW);
    digitalWrite(speakerPin, LOW);
  }
}
Code for heatpad OR speaker circuit with ATtiny85, Loes Bogers, 2019
 Schematic for speaker circuit with ATtiny and mono amp, Loes Bogers, 2019
And here's the proof ;) playing when button pressed, silent otherwise, Loes Bogers, 2019
Controlling a soft speaker with a DFPlayer Mini
This board with a mini SD card holder that can work standalone or with an Arduino (not with the ATtiny though). You could make a full soft MP3 player with this chip! This is the DFplayer Wiki and here's Liza's code to start with. I documented how I work with ATiny extensively for week 5, which you can read here
The DFPlayer Mini MP3 Player For Arduino is a small and low price MP3 module with an simplified output directly to the speaker. The module can be used as a stand alone module with attached battery, speaker and push buttons or used in combination with an Arduino UNO or any other with RX/TX capabilities. – DF Player Wiki
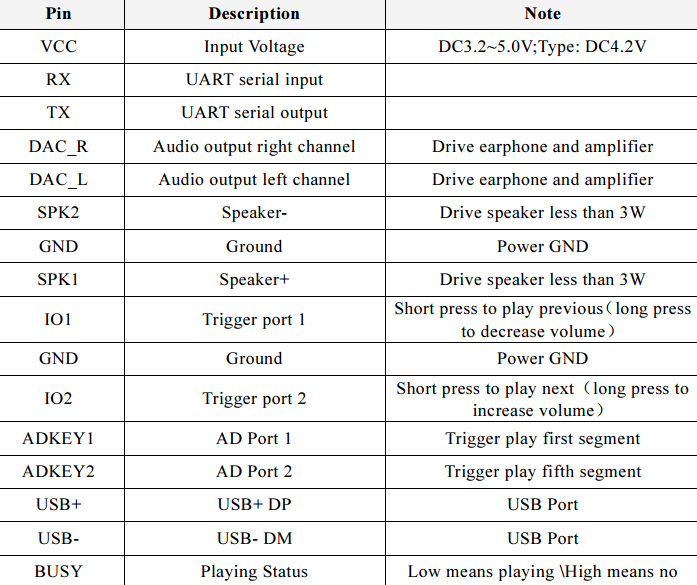
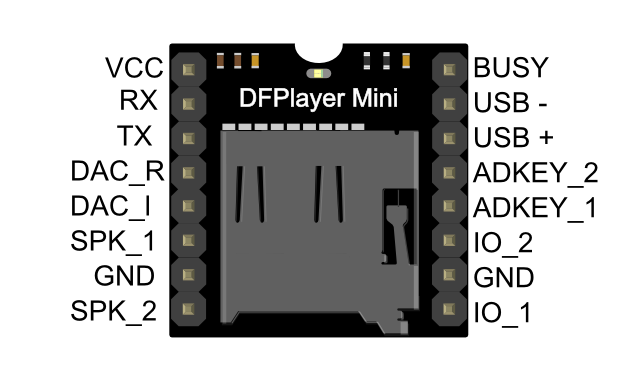 DFPlayer Mini Pinout, source: DFPlayer wiki
DFPlayer Mini Pinout, source: DFPlayer wiki
Important note for audio files. Careful read notes below will save you a lot of precious time!
- DFPlayer Mini read both MP3 and WAV files.
- All audio files must be placed under /mp3 folder.
- Audio file must be named 0001.mp3, 0002.mp3.....0255.mp3 (4 letters not 2 or 3 letters)
- Audio file names can have any characters after 4 digits, such as 0001_Bruno_Mars_Count_On Me.mp3
- Tested few under 1 second WAV files and they did not work
- If one of the audio file is removed from SD cared, DFPlayer still can find it and play it! Weird! In the end, I formatted the SD card to make DFPlayer to play the music I specified.
- Delay(seconds); You have to specify number of seconds delay for the audio file to play completely or the next audio file might be started before current audio is over!
- mp3_play (74); means play audio file 0074.mp3
Source: https://www.dfrobot.com/blog-277.html
Thermochromic pigment + heating pad
Experimenting with thermochromic pigment
We managed to get our hands on two kinds of thermochromic pigment: black that turns grayish/white and green that turns white. I looked up Kobakant's suggestions for thermochromic ink and understood that any dye/pigment/ink you might use for textile, you can use as a binder by just mixing in the pigment.
The only thing to think about is that a pigmented binder might outshine the thermochromic pigment. Using the pale army green with a bright turquoise will just annihilate the effect. If it creates a third color when you mix them, it will probably work.

The black pigment was very dried out, but I could easily dissolve it in a little bit of hot water, and crushing it gently until pasty and then dilute some more
- green pigment + yellow acrylic paint = light green > yellow
- green pigment + pink/purple cabbage ink = grayish > pink/purple
- black pigment + clear binder, like water = black > clear
- black pigment + pearl cream color = grayish pearl > cream pearl
- black pigment + well almost anything lighter than black works really nicely actually! Have a look at Bea's swatches, gorgeous.
I also experimented a bit with stenciling and stamping patterns onto the textile. The acrylic is a bit thick so allows for this quite well on a tightly woven fabric. When just using water, or using acrylic paint that is diluted a little bit more, its nice to paint by making paint strokes with a brush. The creases of the cling film also left interesting marks on the swatch I painted with heavily diluted yellow acrylic paint.
It could be nice to do these measurements a bit more precisely, but for now this will have to do....Still have many circuits to make this week.
When all of these dried, it turned out that only the black pigment adhered to the textile fibre well. I'd need a different binder to make the green one work. The all disintegrated and could be brushed off when dry. Cecilia suggested I try the binder that came with the other pigment, or even to try wood glue.
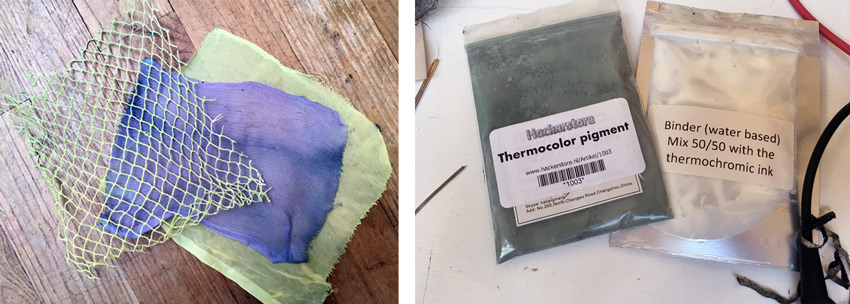 The green pigment that was lost with these swatches, and another binder I could try, Loes Bogers, 2019
Making a transistor circuit
We have a box of transistors here but I found out it's a mix of Voltage Regulators and Mosfets, they don't exactly do the same thing so I had to look at a lot of tiny numbers to find an N-channel MOSFET. I have a IRF530 here, that can control 100V-14A and the pinouts are the same as the example. Gate, Drain, Source from left to right when viewing it from the top.
I added a 1N4007 diode (1000V-1A) for safety in case I want to use it with motors etc at a later stage. Never hurts to protect a circuit. I used this one because it's what I had in my box of stuff, but didn't have the 1N4001 (50V - 1A) Liza suggested. Emma wasn't sure why Liza would put a diode in series to one of the leads, instead of in parallel across the leads. We asked Liza and she said [...]
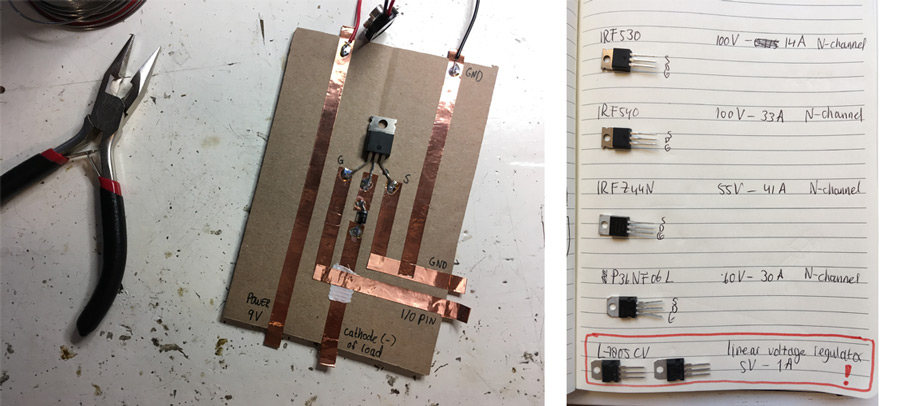 Mosfets and notfets, Loes Bogers, 2019
Calculations to use the coil as heating pad
Since I had a coil that I could use as a heating pad as well, I decided to use it for this experiment as well, at least until I have another coil swatch which I'm working on.
My lasercut coil from lead to lead measures 17.7 Ohm, and I want to run 500mA-1A across the coil so it dissipates a little heat. If I'd aim for 0.5A, Ohm's law will tell me:
- I = 0.5
- R = 17.7
- and V = I*R = 0.5*17.7 = 8.85V
So the Voltage should be 8.85V. I could power this circuit with a 9V battery as well, since I'm at the lower end of the range. For a smaller battery, I'd need to design a less resistive coil. To use a 5V battery for example, I'd need to reduce the resistance to 10Ohm by making the coil shorter or remaking it with a more conductive material.
I tested it with the Lab Power Supply and YES! The pad was getting nice and warm but not hot. Lovely. So now that I got these basics, I calculated Ohm's law for all coil swatches aiming for a 0.5-1A current to give myself options. Some thermochromic swatches are thicker (e.g. the felt one), others are very thin (e.g cotton cheesecloth), so varying in amps might come in handy.
| COIL SWATCH | RESISTANCE (R) | CURRENT (I) | VOLTAGE (V) |
|---|---|---|---|
| Lasercut coil | 17.7 ohm | 0.5 - 1A | 8.85- 17.7V |
| Thread on cotton | 16.6 ohm | 0.5 - 1A | 8.3 - 16.6V |
| Thread on fleather | 17.2 ohm | 0.5 - 1A | 8.6 - 17.2V |
| Crochet copper wire | 5.5 ohm | 0.5 - 1A | 2.75 - 5.5V |
Powering a coil with the ATtiny85 and transistor swatch
I first made a simple circuit with only a button and an LED for debugging. I burned the bootloader of the ATtiny85, and puts some code together using the examples in the IDE. The LED goes on when you press the button.
When that worked, I attached the gate of the MOSFET to pin 3 on the ATtiny, and added it as output in the code. I also added a line of code to say write HIGH to pin 3 (the gate), when button is pressed (and when the LED is also on), and LOW when it isn't. So when you press the button, the heating pad is powered with the 9V battery, and the LED is the indicator that it is heating.
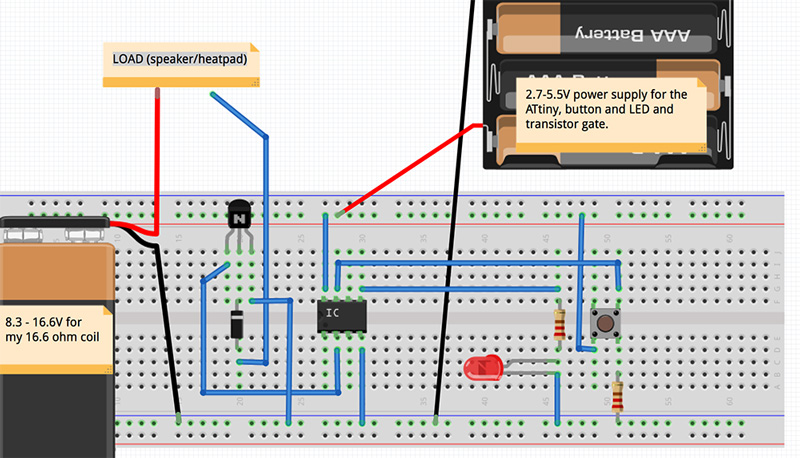 Fritzing my heatpad circuit, Loes Bogers, 2019
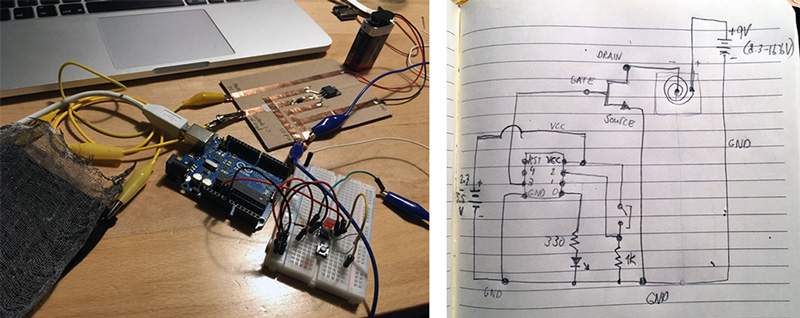 Heatpad circuit schematic, Loes Bogers, 2019
const int buttonPin = 2;     // the number of the pushbutton pin
const int ledPin =  0;      // the number of the LED pin
const int mosfetPin = 3;    // number of MOSFET gate pin

int buttonState = 0;         // variable for reading the pushbutton status

void setup() {
  pinMode(ledPin, OUTPUT);
  pinMode(buttonPin, INPUT);
  pinMode(mosfetPin, OUTPUT);

}

void loop() {
  buttonState = digitalRead(buttonPin);

  if (buttonState == HIGH) {
    digitalWrite(ledPin, HIGH);
    digitalWrite(mosfetPin, HIGH);

  } else {
    digitalWrite(ledPin, LOW);
    digitalWrite(mosfetPin, LOW);
  }
}
Code for heatpad OR speaker circuit with ATtiny85
 Lookit! My heating pad powered with a 9V battery, transistor controlled by an ATtiny, Loes Bogers, 2019
##Emma's tutorial on motion & sound actuators
Both motion and sound are based on the physics principles of electromagnetism. Both motors and speakers work with coils and magnets. Electricity and magnetism are good friends. If you have electricity you always also have a magnetic field. With a coil you can concentrate this magnetic field's force to a limited space, you amplify it. If you run voltage across a coil, it becomes a magnet, so you can move stuff around. This is the basic movement used to make a speaker work, and to make a motor turn. They also have coils.
Lab power supply
Your second best friend! You can define Voltage and a Current limitation for safety reasons. You can also see how much current your power is drawing, therefor it can help you calculate the best power source required for your project.
Working with motion and heat
Working with flipdots etc, you are managing a lot of current, and therefor a lot of heat. It's easy to burn stuff, so you need to know what you're doing. Running 1A current on something for a second is ok, but it gets so hot. You don't want to have it on your skin definitely, it can burn an alligator clip, it will burn you.
Flip dots
Invert the orientation of the magnetic field. You do this by inverting the orientation of the leads (changing VCC and GND).
Speaker
When we hear sound, the air is moving, the hairs in our ear moves, which we perceive as sound. A speaker just moves the air at the right frequency. You need a conductive coil and a magnet that is connected to a membrane (like a cone).
How much current can an Arduino supply?
Arduino can give 5V, but Arduino input/output pins can only sink 20mA per IO pin. An Arduino powered via USB port (the 5V line on the arduino can only give 500mA.
Coil design
Some are spirals, but also the knit speakers by Kobakant works. Why? You just need a lot of loops or circles. They don't necessarily need to be nested, like a spiral is. They can also be next to each other like a crocheted textile. What is imporant is that it is made from one continuous piece of conductive material, that is not touching/connecting in between, and that you can access both ends.
DFPlayer Mini It's amazing! A board with a mini SD card holder that can work standalone or with an Arduino (not with the ATtiny though). You could make a full soft MP3 player with this chip! Read the AD KEY MODE chapter on their wiki. Apparently all it needs is more resistors and switches. Cooool.
Generating heat
Make a heating element! You need a lot of current going through a conductive material that can take the heat :) What is important is to know how much resistance the pattern and the materials have. If the resistance is high the current is lower and it might not heat up well. See Liza's slide for material options and tips for use:
- Stainless steel conductive thread
- Karl Grimm conductive thread
- Conductive fabrics
- Nichrome wire or flexinol
High power LED
3V, 220mA. You need to dissipate the heat, that's why it's often soldered onto a little board, it's made of metal and works like a heatsink.
Vibration motors
Operates on 3V, around 75mA. But can also run between 2-5V with different current.
1.5-3V at 70mA with the device we buy at Radio Rotor.
With this Liza used a bipolar NPN Transistor: a 2N2222 transistor and a 0.1mF capacitor and the 1N4001 diode to protect Arduino from voltage spikes, and a 1K resistor.
Shape memory allows (SMAs)