# 09 **SOFT ROBOTICS**
## **RESEARCH AND INSPIRATION**
<iframe width="1000" height="400" src="https://www.youtube.com/embed/iwQRYzLZvGE?si=OYTvKYx7d0yqSLy6" title="YouTube video player" frameborder="0" allow="accelerometer; autoplay; clipboard-write; encrypted-media; gyroscope; picture-in-picture; web-share" allowfullscreen></iframe>
<iframe width="1000" height="400" src="https://www.youtube.com/embed/YUhU-QckCSE?si=MywfHPKkYS7LhT15" title="YouTube video player" frameborder="0" allow="accelerometer; autoplay; clipboard-write; encrypted-media; gyroscope; picture-in-picture; web-share" allowfullscreen></iframe>
<iframe width="1000" height="400" src="https://www.youtube.com/embed/fkbIXSSFnyY?si=51ebLcsRMBjGlAqX" title="YouTube video player" frameborder="0" allow="accelerometer; autoplay; clipboard-write; encrypted-media; gyroscope; picture-in-picture; web-share" allowfullscreen></iframe>
## **INFLATABLES**
**How do they work?**
“The majority of inflatable structures are made up of an air cavity wall and roof. The structure is inflated and supported by a constant supply of air which is drawn from an integral fan with constant power. The air is drawn in from outside of the structure with a centrifugal fan. The fan sits in line with the structure and produces the airflow and pressure needed to lift the inflatable pod, cube or dome. The structure is made out of segments or panels which are sewn together with stitching and seams. These seams allow the structure to not over inflate as they continually leak through the hundreds of thousands of stitching holes created through the sewing. Internal ribs or straps allow the structure to form the shape of the structure. There are 2 membranes to an inflatable structure, an inner and an outer, the outer membrane surface is exposed to the outdoor or exterior environment and the inner membrane surface is exposed to the activity and people inside the structure. Air passed between these two membranes or air cavity walls and roof then escapes through the extremely small holes of the sewing or stitching. The air loss through the permeability of the material itself is limited by the addition of a PU (polyurethane) coating on the reverse of the material. Without this coated backing, the structure would not withhold enough air pressure to inflate and keep the structure inflated.”
From [How do inflatable structures work?](https://www.optixinflatablestructures.com/post/how-do-inflatable-structures-work#:~:text=The%20majority%20of%20inflatable%20structures,structure%20with%20a%20centrifugal%20fan.)
### **HEATPRESSING VINYL**
I tried some inflatables by heatpressing vinyls with a heat press. An air-channel can be created by placing a piece of baking paper in between 2 pieces of vinyls before heatpressing. The baking paper prevents the vinyls from melting into each other.
**MATERIALS AND TOOLS**
1. Heat Transfer Vinyl
2. Heat Press
3. Baking Paper
4. Paper Scissors
5. Straw
**STEPS**
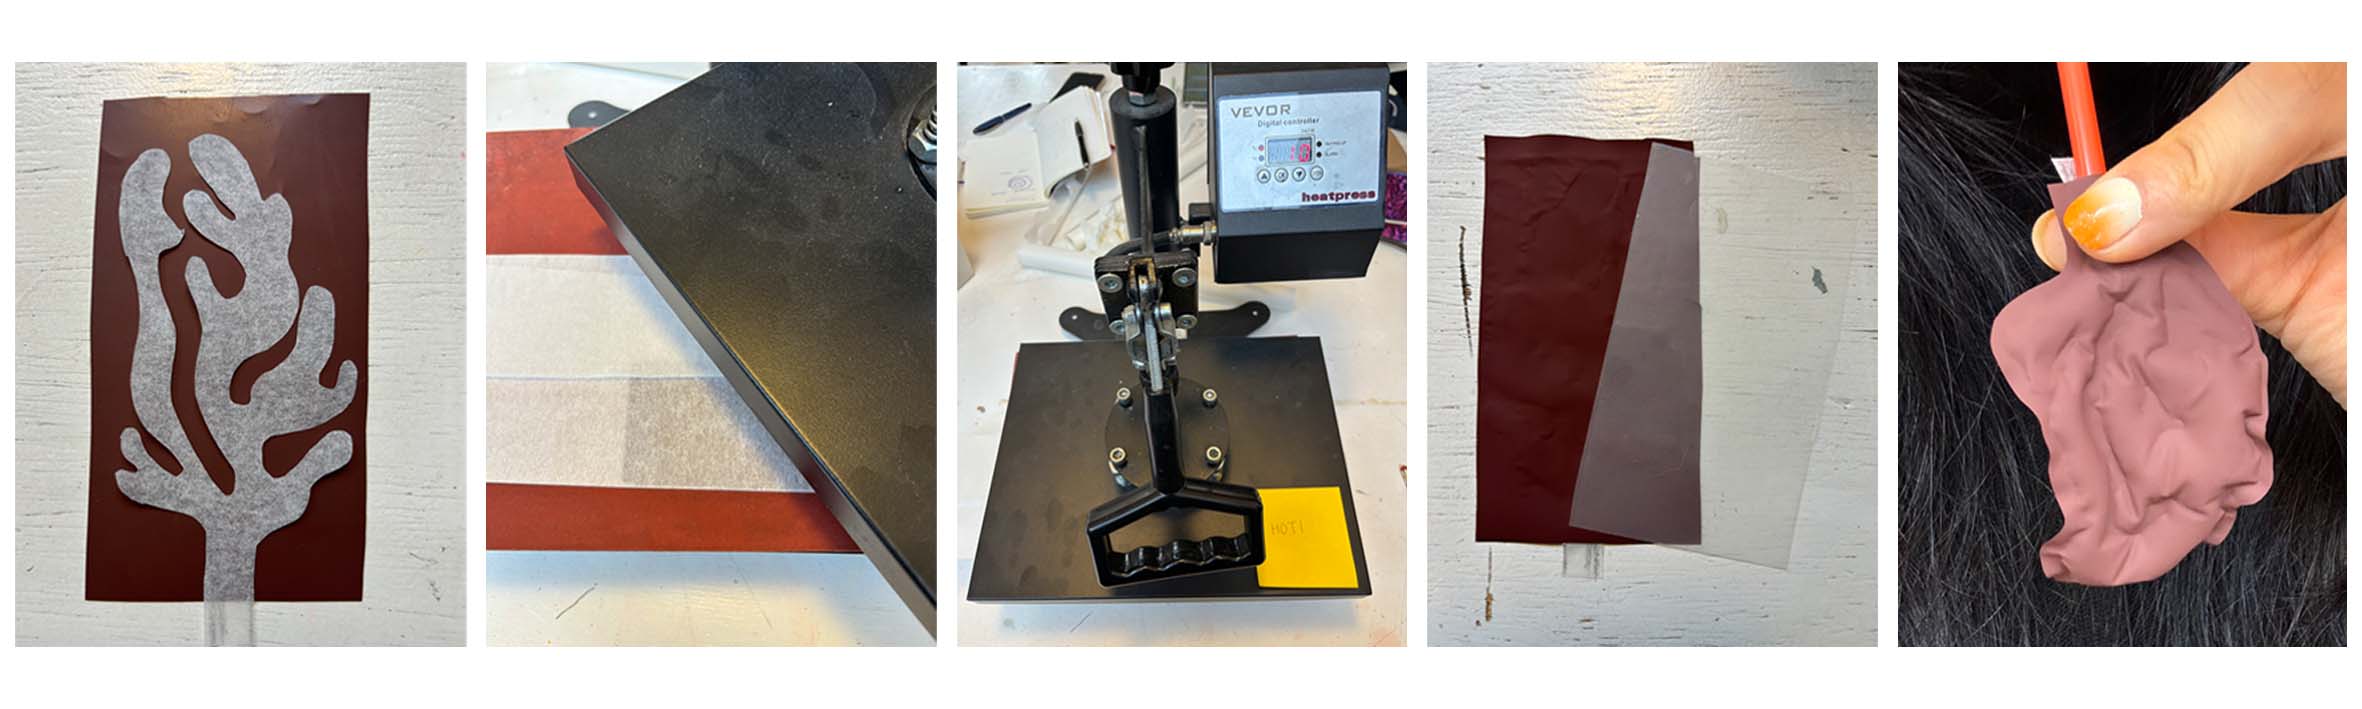
1. Cut 2 pieces of vinyls so they fit the size of the heat press.
2. Draw the shapes of the air channel you want on the baking paper and then cut them out. Remember you have to leave an opening for inserting the straw later.
3. Place the baking paper in place between the vinyls.
4. Set the heat press to 150° C.
5. Place 2 pieces of baking paper on top and under the vinyls to prevent them from sticking to the heat press, the baking papers have to be bigger than the vinyls.
6. Press the vinyls for 15 seconds and then take them out.
#### **1ST SAMPLE**
{ width=1000}
I drew a very organic shape to see what would happen. After heatpressing the vinyls together I cut off the excess parts around the shape. Surprisingly, when I blow air into the inflatable, it bends at where the shape becomes narrow.
<div style="padding:71.29% 0 0 0;position:relative;"><iframe src="https://player.vimeo.com/video/886744883?badge=0&autopause=0&quality_selector=1&player_id=0&app_id=58479" frameborder="0" allow="autoplay; fullscreen; picture-in-picture" style="position:absolute;top:0;left:0;width:100%;height:100%;" title="IMG_2567"></iframe></div><script src="https://player.vimeo.com/api/player.js"></script>
#### **2ND SAMPLE**
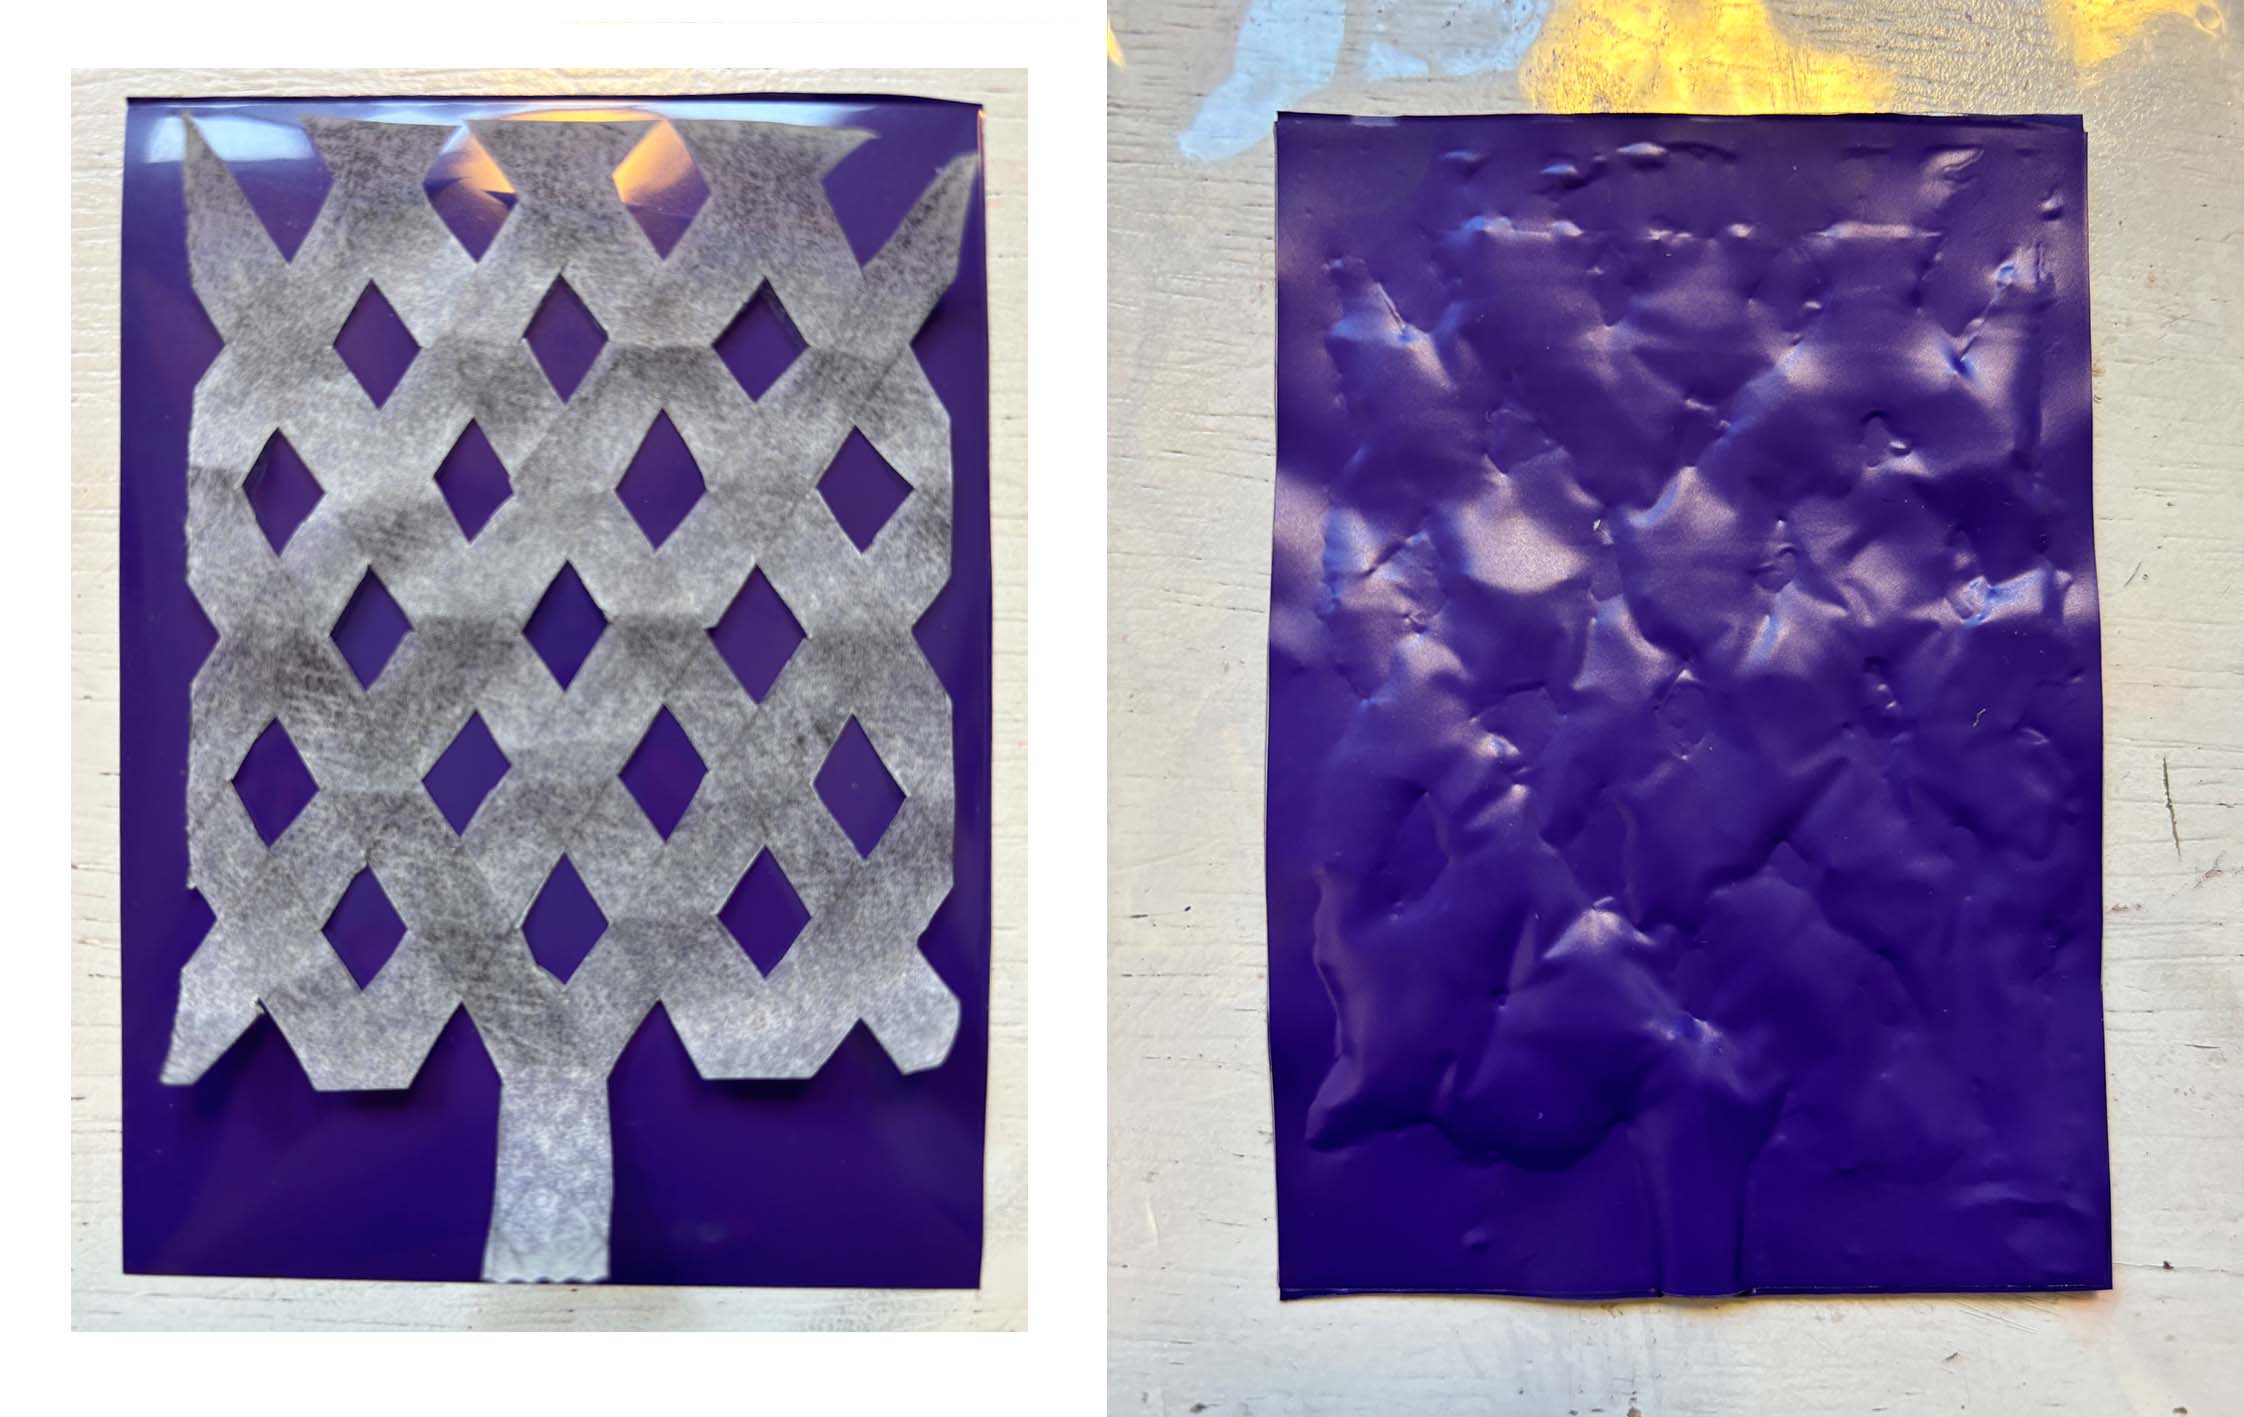{ width=1000}
With the second sample I cut out a grid. The rectangular inflatable contracts when I blow air into it. However, here you can see that the vinvyls don't melt perfectly
together to give you the shape that you want. I have tried multiple ways to solve this but it seems like this problem keeps reocurring :(
<div style="padding:75% 0 0 0;position:relative;"><iframe src="https://player.vimeo.com/video/886750150?badge=0&autopause=0&quality_selector=1&player_id=0&app_id=58479" frameborder="0" allow="autoplay; fullscreen; picture-in-picture" style="position:absolute;top:0;left:0;width:100%;height:100%;" title="IMG_2569"></iframe></div><script src="https://player.vimeo.com/api/player.js"></script>
### **BAKING PAPER ORIGAMI**
#### **INSPIRATION**
<iframe width="1000" height="400" src="https://www.youtube.com/embed/Ir69MXyOvFs?si=Wc0iBfhKwFj_iD-f" title="YouTube video player" frameborder="0" allow="accelerometer; autoplay; clipboard-write; encrypted-media; gyroscope; picture-in-picture; web-share" allowfullscreen></iframe>
#### **1ST SAMPLE**
I really like the idea of inflatable origami and want to make some with baking paper. I fold some simple pleats and sealed the edges with glue. However after it expands once, it cannot come back to its original shape.
<div style="padding:75% 0 0 0;position:relative;"><iframe src="https://player.vimeo.com/video/886931107?badge=0&autopause=0&quality_selector=1&player_id=0&app_id=58479" frameborder="0" allow="autoplay; fullscreen; picture-in-picture" style="position:absolute;top:0;left:0;width:100%;height:100%;" title="IMG_2598"></iframe></div><script src="https://player.vimeo.com/api/player.js"></script>
#### **2nd SAMPLE**
<div style="padding:75% 0 0 0;position:relative;"><iframe src="https://player.vimeo.com/video/886932738?badge=0&autopause=0&quality_selector=1&player_id=0&app_id=58479" frameborder="0" allow="autoplay; fullscreen; picture-in-picture" style="position:absolute;top:0;left:0;width:100%;height:100%;" title="IMG_2594"></iframe></div><script src="https://player.vimeo.com/api/player.js"></script>
### **LASERCUTTING TPU**
**MATERIALS AND TOOS**
1. TPU
2. Laser Cutter
3. Electronic air pump
4. Rhino
**LASER SETTINGS**
Note: This setting only works for **GREEN** TPU. (We later noticed that different colours of the same material requires slightly different settings.)
**CUT LINE**
Speed:100
Power Max:35
Power Min:10
Use the normal jig to focus laser
**WELDING LINE**
Speed:80
Power Max:40
Power Min:10
Use all the jigs (38 mm) to unfocus laser
#### **1ST SAMPLE**
For lasercutting tpu, I decided to do a series of flowers. I designed the patterns on Rhino.
{ width=1000}
**PROCESS**
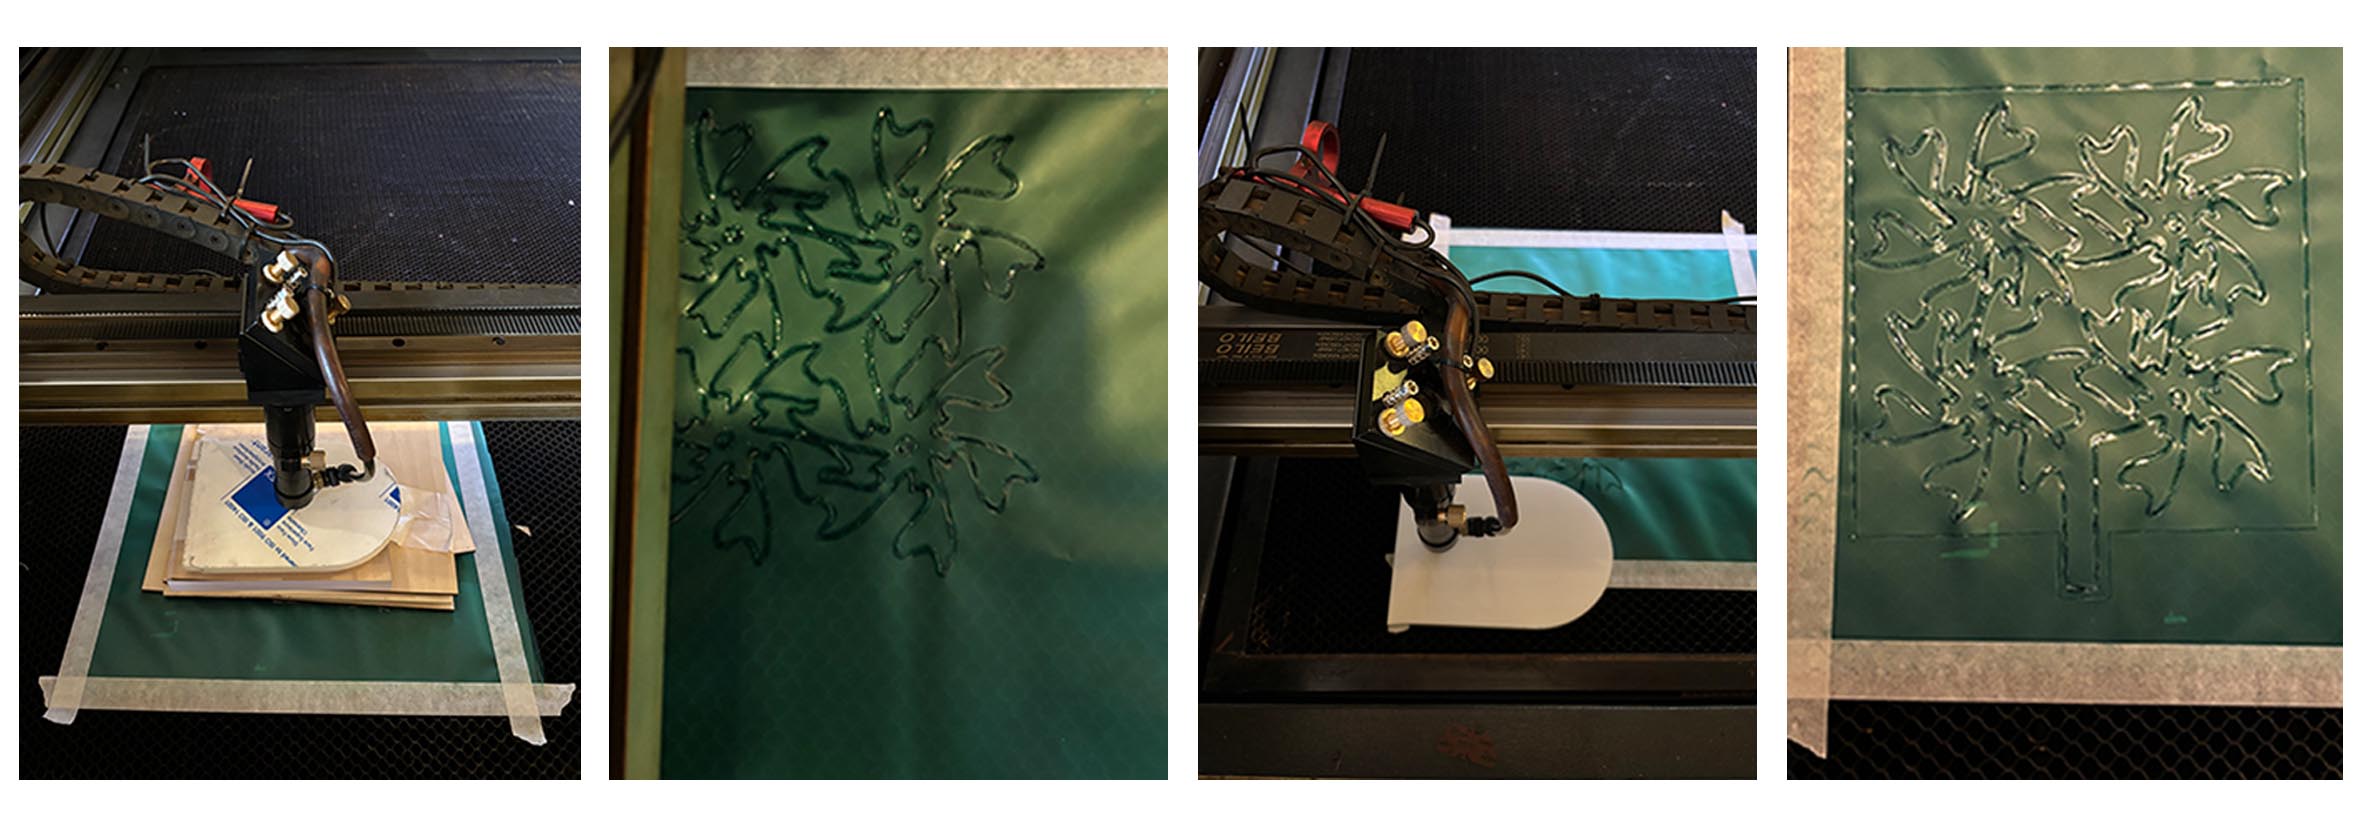{ width=1000}
Since it's quite big in size I used an air pump to inflate it. The TPU expands and makes the patterns look more 3D. But the air doesn't pass through some narrow parts that well.
{ width=1000}
You can download the fabrication file here [^1].
#### **2ND SAMPLE**
{ width=1000}
For the second one I left more space for the air to pass through.
**PROCESS**
{ width=1000}
In result, more air passing through gives some more obvious movements to the tpu when inflated, and it slightly bends in the middle.
<div style="padding:107.24% 0 0 0;position:relative;"><iframe src="https://player.vimeo.com/video/886855994?badge=0&autopause=0&quality_selector=1&player_id=0&app_id=58479" frameborder="0" allow="autoplay; fullscreen; picture-in-picture" style="position:absolute;top:0;left:0;width:100%;height:100%;" title="INFLATABLE"></iframe></div><script src="https://player.vimeo.com/api/player.js"></script>
You can download the fabrication file here [^2].
#### **3RD SAMPLE**
{ width=1000}
Since the first 2 were all squared I want to make another that's narrow and long. As you can see in the video the tpu shrinks horizontally.
<div style="padding:56.25% 0 0 0;position:relative;"><iframe src="https://player.vimeo.com/video/886744241?badge=0&autopause=0&quality_selector=1&player_id=0&app_id=58479" frameborder="0" allow="autoplay; fullscreen; picture-in-picture" style="position:absolute;top:0;left:0;width:100%;height:100%;" title="IMG_2675"></iframe></div><script src="https://player.vimeo.com/api/player.js"></script>
You can download the fabrication file here [^3].
#### **4TH SAMPLE**
After cutting off the excess tpu around the flowers, the inflatable is lighter and shrinks more dramatically.
<div style="padding:59.8% 0 0 0;position:relative;"><iframe src="https://player.vimeo.com/video/886744606?badge=0&autopause=0&quality_selector=1&player_id=0&app_id=58479" frameborder="0" allow="autoplay; fullscreen; picture-in-picture" style="position:absolute;top:0;left:0;width:100%;height:100%;" title="INFLATABLE"></iframe></div><script src="https://player.vimeo.com/api/player.js"></script>
You can download the fabrication file here [^3].
#### **5TH SAMPLE**
{ width=1000}
I really like how this one resulted. The flowers shrinks toward the centre. The petals are all slightly bent to the right and thus they move towards the right when inflated.
<div style="padding:139.26% 0 0 0;position:relative;"><iframe src="https://player.vimeo.com/video/886745356?badge=0&autopause=0&quality_selector=1&player_id=0&app_id=58479" frameborder="0" allow="autoplay; fullscreen; picture-in-picture" style="position:absolute;top:0;left:0;width:100%;height:100%;" title="IMG_2667 3"></iframe></div><script src="https://player.vimeo.com/api/player.js"></script>
You can download the fabrication file here [^4].
#### **FAILED SAMPLE**
This one failed because some welding lines are too close to each other when I designed the pattern. Some parts were melt together and some parts had holes.
{ width=1000}
You can download the fabrication file here [^5].
**Note**: when you are working with different colours, test the settings when switching colours even though the material is the same. My observation is that, the darker the color is, the lower the setting it requires, and the lighter the color is, the higher the setting it requires.
## **SOFT ROBOTICS**
<div class="sketchfab-embed-wrapper"> <iframe title="4-LEG-GRIPPER" frameborder="0" allowfullscreen mozallowfullscreen="true" webkitallowfullscreen="true" allow="autoplay; fullscreen; xr-spatial-tracking" xr-spatial-tracking execution-while-out-of-viewport execution-while-not-rendered web-share width="1000" height="400" src="https://sketchfab.com/models/42836868a1d14e7b9a2471c8fd1d5208/embed?autospin=1&autostart=1&camera=0"> </iframe> </div>
We used the PLA mold for the griping actuator from the lab. We used [this model](https://www.instructables.com/Air-Powered-Soft-Robotic-Gripper/) to print the mold.
### **MOULDS**
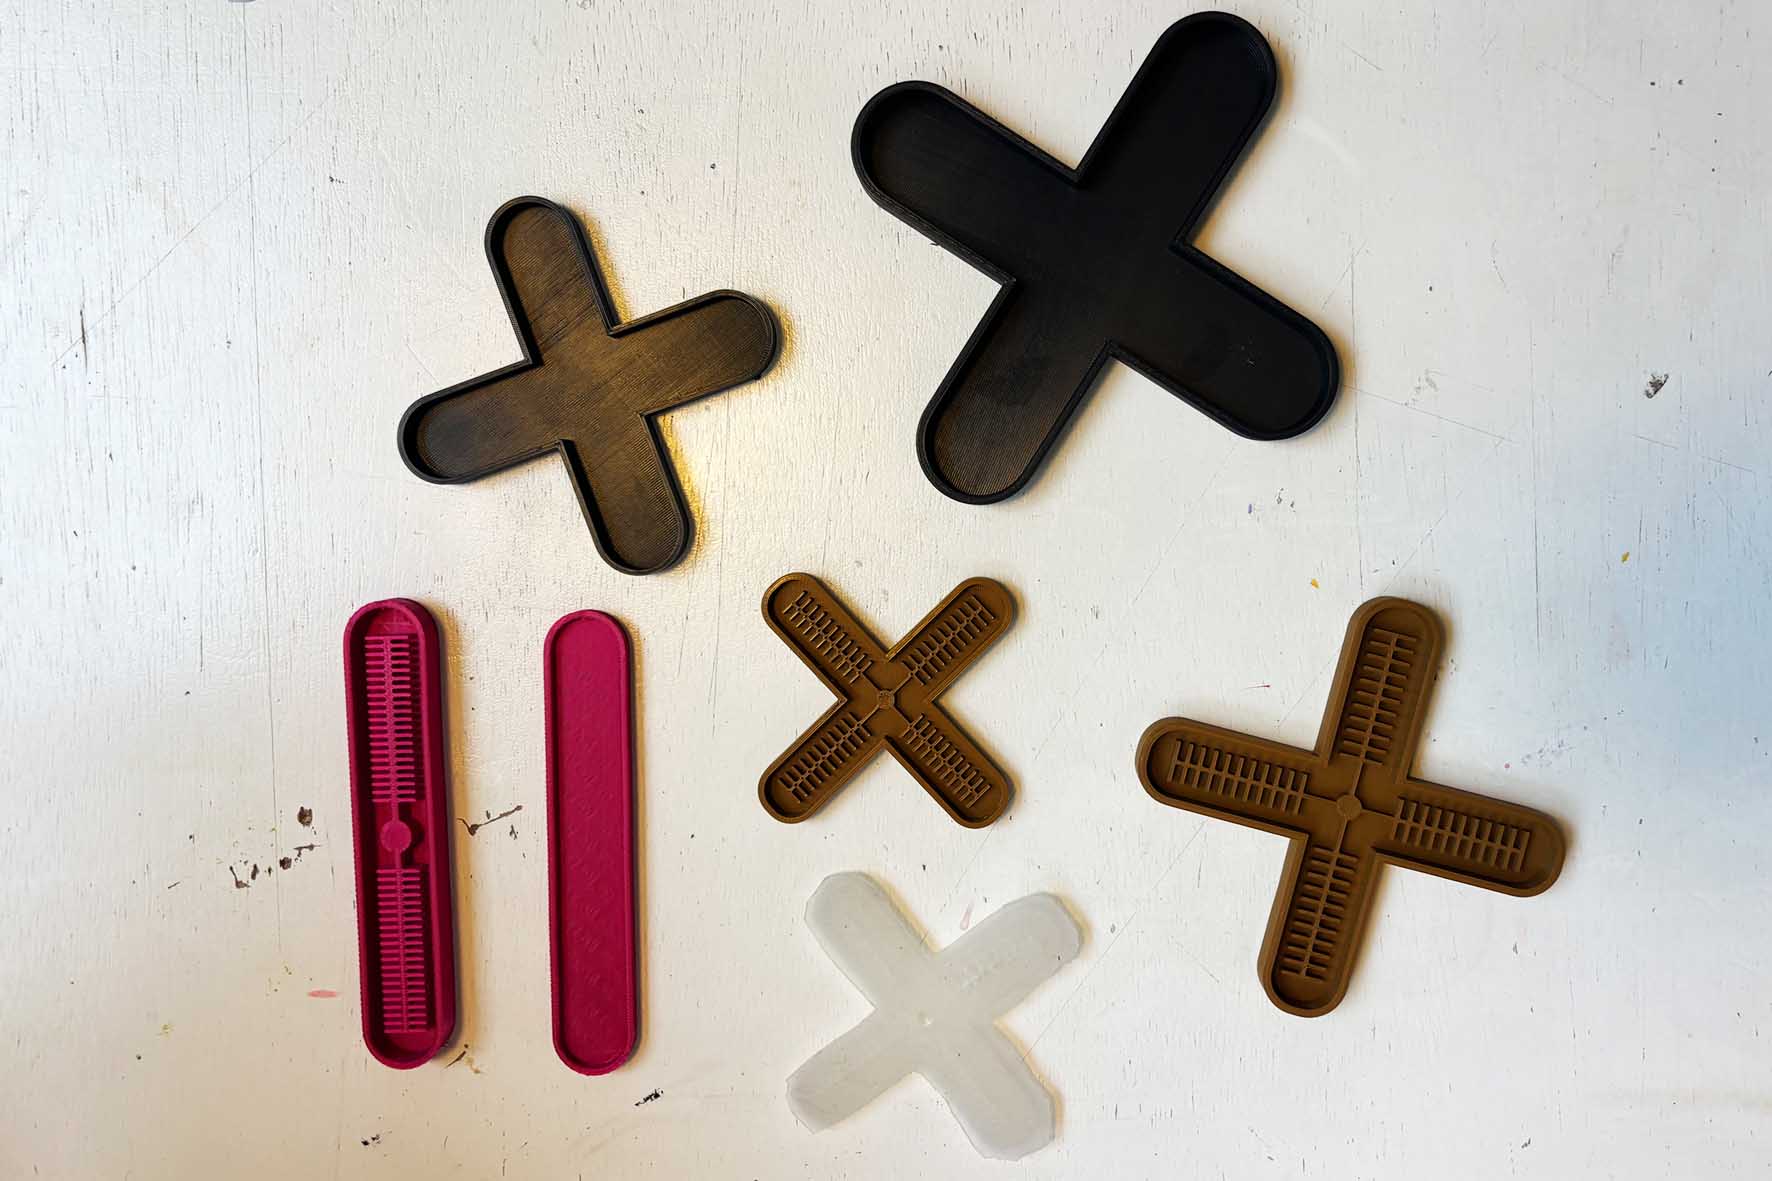{ width=1000}
### **SILICON GRIPPER**
{ width=1000}
**PROCESS**
1. Mix equal amounts of Part A and Part B of Ecoflex 00-30. The mixture will start curing in 45 minutes so it should be casted before then.
2. Cast the silicon into the molds. You need two of the same size. The mixture will start curing in 45 minutes so it should be casted before then.
3. Leave it in cool room temoerature for 4 hours until it's completely cured.
4. Prepare a small amount of silicon to seal the two parts together.
5. Leave it in cool room temoerature for another 4 hours until it's completely cured.
{ width=1000}
Avoid making too much air bubbles when casting and remove as much as you can. Asli has some useful tips on casting silicon, you can check it out [here](https://class.textile-academy.org/2024/asli-aksan/assignments/week09/)
{ width=1000}
<div style="padding:56.25% 0 0 0;position:relative;"><iframe src="https://player.vimeo.com/video/886747622?badge=0&autopause=0&quality_selector=1&player_id=0&app_id=58479" frameborder="0" allow="autoplay; fullscreen; picture-in-picture" style="position:absolute;top:0;left:0;width:100%;height:100%;" title="SOFT ROBOTICS"></iframe></div><script src="https://player.vimeo.com/api/player.js"></script>
### **GELATIN GRIPPER**
{ width=1000}
**RECIPE**
100 grams Gelatin
100 grams Glycerine
500 ml water
### **FLOWER GRIPPER**
To continue the flower series I made my own acrylic molds. You also need to have two parts.
Part 1: a base layer, air channel, and frames to give thickness to the silicon
Part 2: a base layer and frames to give thickness to the silicon
{ width=1000}
{ width=1000}
Glue the layers together with a super glue and start casting.
{ width=1000}
{ width=1000}
{ width=1000}
You can download the fabrication file here [^6].
## **FABRICATION FILES**
[^1]: [1st Sample](../files/WEEK8/FLOWER1.svg)
[^2]: [2nd Sample](../files/WEEK8/FLOWER2.svg)
[^3]: [3rd and 4th Sample](../files/WEEK8/FLOWER5.svg)
[^4]: [5th Sample](../files/WEEK8/FLOWER3.svg)
[^5]: [Failed Sample](../files/WEEK8/FLOWER4.svg)
[^6]: [Flower Base](../files/WEEK8/BASEFLOWER.svg)[Flower Frame](../files/WEEK8/BORDERFLOWER.svg)[Flower Airchannel](../files/WEEK8/MIDDLEFLOWER.svg)